SSH Into Raspberry Pi Over Internet: Your Ultimate Remote Access Guide
Are you looking to take full control of your Raspberry Pi, no matter where you are in the world? Learning how to ssh into Raspberry Pi over the internet is a game-changer, transforming your compact computer into a powerful, accessible hub for various online services and applications. This comprehensive guide will walk you through the most secure and convenient methods to achieve seamless remote access.
Whether you're managing a home automation system, hosting a personal web server, or simply need to troubleshoot a project while away, the ability to remotely control your Raspberry Pi from any device connected to the internet is invaluable. Forget the complexities of traditional network configurations; we'll explore modern, secure techniques that bypass common hurdles like port forwarding, ensuring your connection is both reliable and protected.
Table of Contents
- Understanding Remote Access to Your Raspberry Pi
- Essential Pre-requisites for Your Raspberry Pi
- Traditional Method: Port Forwarding (and why to avoid it for most)
- Secure & Convenient Methods: Bypassing Port Forwarding
- Step-by-Step Guide: Setting Up Pitunnel for SSH into Raspberry Pi Over Internet
- Enhancing Security for Your Remote SSH Connection
- Troubleshooting Common SSH Connection Issues
- Beyond SSH: Other Remote Access Options
- Conclusion
Understanding Remote Access to Your Raspberry Pi
One common method to remotely access a Raspberry Pi is using Secure Shell (SSH), a network protocol that provides a secure way to communicate with a remote device. SSH allows you to execute commands, transfer files, and even establish secure tunnels over an unsecured network like the internet. Think of it as a secure, encrypted tunnel directly into your Raspberry Pi's command line interface, giving you full administrative control from anywhere. The primary reason individuals seek to remotely control their Raspberry Pi is convenience and capability. Whether your Pi is tucked away in a server closet, deployed as part of an IoT project, or simply running headless (without a monitor, keyboard, or mouse), SSH enables you to interact with it as if you were sitting right in front of it. This capability is crucial for managing long-running projects, performing updates, or deploying new code without physical access. However, the internet, by its very nature, is a public network. Directly exposing your Raspberry Pi to the open internet can introduce significant security risks if not handled correctly. This is where secure methods become paramount. While the concept of accessing your Raspberry Pi from afar seems straightforward, the challenges often lie in network configurations, especially when your Pi is behind a private home network router. Traditional methods often involve modifying router settings, which can be daunting for many and potentially compromise network security if not done with extreme care. This article will focus on safer, more user-friendly alternatives to help you securely ssh into Raspberry Pi over the internet.Essential Pre-requisites for Your Raspberry Pi
Before you can begin the journey of remote access, your Raspberry Pi needs to be properly prepared. These foundational steps ensure that your device is online and ready to accept secure shell connections.Connecting Your Raspberry Pi to the Internet
First and foremost, ensure that your Raspberry Pi is connected to the internet. This might seem obvious, but a stable internet connection is the bedrock of any remote access strategy. You can connect your Raspberry Pi via:- Ethernet Cable: For the most reliable and fastest connection, plug an Ethernet cable directly from your Raspberry Pi to your router.
- Wi-Fi: If your Raspberry Pi model has built-in Wi-Fi (most modern ones do) or you're using a Wi-Fi dongle, you can connect it wirelessly. This can be done through the Raspberry Pi OS graphical interface (click the Wi-Fi icon in the top right corner) or via the command line using `raspi-config`.
Installing OpenSSH Server on Raspberry Pi OS
SSH functionality isn't always enabled by default on Raspberry Pi OS, especially with newer versions for security reasons. To allow remote SSH connections, you need to ensure the OpenSSH server package is installed and active. SSH should be installed on all Raspberry Pi devices you intend to access remotely. To install OpenSSH server, open a terminal on your Raspberry Pi and run:sudo apt update sudo apt install openssh-serverTraditional Method: Port Forwarding (and why to avoid it for most)
Historically, the most common way to access a device within a private network from the internet was through port forwarding. This method involves configuring your router to direct incoming traffic on a specific port (e.g., port 22 for SSH) from the internet to a particular device (your Raspberry Pi) on your local network.How Port Forwarding Works (briefly)
Your home router acts as a firewall, protecting your internal network. When you initiate an SSH connection from outside your home network, the request first hits your router's public IP address. Without port forwarding, the router wouldn't know which internal device to send that request to and would simply drop it. Port forwarding tells the router: "Any traffic coming in on public port X, send it to internal IP address Y on internal port Z." For SSH, this would typically be public port 22 to your Raspberry Pi's local IP address on internal port 22.Security Risks and Downsides
While effective, port forwarding comes with significant security implications that make it less desirable for many users, especially when trying to ssh into Raspberry Pi over the internet:- Direct Exposure: Your Raspberry Pi's SSH port becomes directly exposed to the entire internet. This makes it a potential target for automated scanning tools and malicious actors looking for vulnerable systems.
- Increased Attack Surface: Every open port is an attack surface. If there's a vulnerability in the SSH server software (OpenSSH) or your Pi's operating system, an attacker could exploit it.
- Dynamic IP Addresses: Most home internet connections use dynamic IP addresses, meaning your public IP changes periodically. This requires using a Dynamic DNS (DDNS) service, adding another layer of complexity.
- Router Configuration Complexity: Setting up port forwarding requires accessing your router's administrative interface, which can vary greatly between manufacturers and may be intimidating for novice users.
Secure & Convenient Methods: Bypassing Port Forwarding
Thankfully, you don't need to expose your home network to the perils of direct port forwarding to remotely control your Raspberry Pi. There are free online services and robust networking solutions that allow you to securely ssh into Raspberry Pi over the internet without modifying anything in your router settings. These methods typically involve establishing an outbound connection from your Raspberry Pi to a secure server, creating a tunnel that can then be accessed from your client device.Using VPN for Secure Remote Access
A Virtual Private Network (VPN) creates a secure, encrypted tunnel between your client device and your home network (or a VPN server). If you set up a VPN server on your home network (e.g., on your router, a dedicated server, or even your Raspberry Pi itself), you can connect to this VPN from anywhere. Once connected, your client device effectively becomes part of your home network, allowing you to SSH into your Raspberry Pi using its local IP address as if you were physically at home. * Pros: Highly secure, encrypts all traffic, allows access to all devices on your home network, not just the Pi. * Cons: Requires setting up and maintaining a VPN server (which can be complex), might require port forwarding for the VPN server itself (though some routers support VPN passthrough without it), can add latency. * Popular VPN solutions: OpenVPN, WireGuard (often considered faster and simpler to set up), PiVPN (a script to easily set up OpenVPN or WireGuard on a Raspberry Pi). While a self-hosted VPN offers ultimate control and security, its setup complexity can be a barrier for many.Leveraging Cloud-Based Tunneling Services (e.g., Pitunnel)
This category represents some of the simplest and most secure methods for remote access without router configuration. These services work by having your Raspberry Pi establish an *outbound* connection to a secure server hosted by the service provider. This creates a "tunnel." When you want to connect to your Pi, you connect to the service provider's server, which then routes your connection through the established tunnel to your Pi. Since the connection is initiated *from* your Pi, it bypasses router firewalls and NAT (Network Address Translation) restrictions. * Pros: Extremely easy to set up, no router configuration needed, works with dynamic IP addresses, highly secure as no inbound ports are opened on your router, often provides a stable public endpoint. * Cons: Relies on a third-party service (ensure it's reputable), free tiers might have limitations (e.g., speed, number of tunnels), requires an internet connection on both ends.Introduction to Pitunnel
Pitunnel is an excellent example of such a service. It's specifically designed for Raspberry Pi users to create secure tunnels for SSH, VNC, HTTP, and other services. In this article, we will guide you through how to use Pitunnel to allow you to access SSH for your Raspberry Pi from anywhere in the world. We will do this by using the custom tunnels feature of Pitunnel, which is both flexible and robust. Pitunnel provides a stable public URL or IP address that maps directly to your Raspberry Pi's SSH port, making it incredibly convenient to connect.Setting up Pitunnel for SSH Access
The process generally involves: 1. Signing up for an account with the service (e.g., Pitunnel). 2. Installing the client software on your Raspberry Pi. 3. Configuring the client to create a tunnel for your SSH service (typically port 22). 4. Connecting from your client device using the public address provided by the service. This approach offers a fantastic balance of security, ease of use, and reliability, making it a top recommendation for anyone looking to ssh into Raspberry Pi over the internet without the headache of network engineering.Step-by-Step Guide: Setting Up Pitunnel for SSH into Raspberry Pi Over Internet
This section will provide a detailed walkthrough on how to use Pitunnel, one of the most straightforward and secure methods, to establish a remote SSH connection to your Raspberry Pi. The steps below will help you configure your Raspberry Pi so it can be accessed remotely through SSH, leveraging Pitunnel's custom tunnels feature.1. Creating a Pitunnel Account
First, you need to register for a Pitunnel account. Visit the official Pitunnel website (pitunnel.com) and sign up. Most services offer a free tier that is sufficient for basic SSH access, though paid plans provide more features like dedicated domains or higher bandwidth.
Once registered, you'll typically find an API key or authentication token in your account dashboard. Keep this secure, as it's essential for linking your Raspberry Pi to your Pitunnel account.
2. Installing Pitunnel on Your Raspberry Pi
With your account ready, the next step is to install the Pitunnel client software on your Raspberry Pi. Open a terminal on your Raspberry Pi and follow these commands:
# Update your package list sudo apt update # Install curl if you don't have it sudo apt install curl # Download and run the Pitunnel installation script curl -L https://pitunnel.com/install.sh | sudo bashThis script will download and install the Pitunnel client, setting it up as a system service. After installation, you'll be prompted to enter your Pitunnel API key/token. Enter it carefully to link your Pi to your account.
3. Configuring a Custom Tunnel for SSH
Now, you need to tell Pitunnel to create a tunnel specifically for your SSH service (which runs on port 22 by default). Pitunnel makes this process very intuitive. You can configure tunnels either through the Pitunnel web dashboard or directly on your Raspberry Pi's terminal.
Method A: Via Pitunnel Web Dashboard (Recommended for ease)
- Log in to your Pitunnel account on their website.
- Navigate to the "Tunnels" or "Devices" section.
- Find your registered Raspberry Pi and click on "Add Tunnel" or a similar option.
- Configure the tunnel details:
- Type: Select "SSH" or "TCP".
- Local Port: Enter `22` (this is the default SSH port on your Raspberry Pi).
- Remote Port/Domain: Pitunnel will usually assign a unique public URL or port for your tunnel. You might be able to customize this on paid plans.
- Description: Add a friendly name like "My Pi SSH".
- Save the tunnel configuration. Pitunnel's service on your Raspberry Pi should automatically detect this new configuration and establish the tunnel.
Method B: Via Raspberry Pi Terminal (Advanced)
You can also configure tunnels by editing Pitunnel's configuration file on your Pi. While less common for simple SSH, it offers more control.
sudo nano /etc/pitunnel.confAdd a section for your SSH tunnel, similar to this (adjusting `your_token` and `tunnel_id` if necessary, though the web dashboard is usually easier for initial setup):
[ssh_tunnel] type = tcp local_port = 22 remote_port = 2222 ; Or a custom port assigned by Pitunnel After saving the file, restart the Pitunnel service:
sudo systemctl restart pitunnelVerify the tunnel status on your Pitunnel dashboard. It should show as "Online" or "Connected." You'll be given a public address (e.g., `your_pi_id.pitunnel.com:XXXXX` or an IP address and port) that you'll use to connect.
4. Connecting from Your Client Device
Now that your Pitunnel SSH tunnel is active, you can ssh into Raspberry Pi over the internet from any computer (Windows, Linux, macOS) or even a mobile device.
On Linux or macOS:
Open your terminal and use the `ssh` command with the Pitunnel-provided address and port:
ssh -p XXXXX pi@your_pi_id.pitunnel.com(Replace `XXXXX` with the remote port Pitunnel assigned and `your_pi_id.pitunnel.com` with your actual Pitunnel address. `pi` is the default username for Raspberry Pi OS.)
On Windows 10/11:
Windows 10 and 11 have a built-in SSH client in PowerShell or Command Prompt. Open either and use the same command as above:
ssh -p XXXXX pi@your_pi_id.pitunnel.comAlternatively, you can use a dedicated SSH client like PuTTY. In PuTTY:
- Enter the Pitunnel-provided address in the "Host Name (or IP address)" field.
- Enter the remote port (XXXXX) in the "Port" field.
- Select "SSH" as the connection type.
- Click "Open" and enter your username (`pi`) and password when prompted.
First, you have to enable the SSH on your Pi because it will be disabled by default. By following these steps, you will have successfully established a secure remote SSH connection to your Raspberry Pi, accessible from anywhere with an internet connection, without touching your router settings.
Enhancing Security for Your Remote SSH Connection
While using services like Pitunnel significantly enhances security by avoiding direct exposure, it's crucial to implement additional security measures on your Raspberry Pi itself. Sshing into your Raspberry Pi over the internet, even through a tunnel, still means you're providing a potential entry point. These practices are fundamental for any remote access setup.Using SSH Key-Based Authentication (No Passwords)
This is arguably the most critical security upgrade you can make. Instead of relying on passwords (which can be guessed or brute-forced), SSH key-based authentication uses a pair of cryptographic keys: a private key (kept secret on your client device) and a public key (placed on your Raspberry Pi). When you try to connect, the Pi challenges your client, and if the keys match, access is granted without a password. 1. Generate SSH Keys: On your client computer (Windows, Linux, macOS), open a terminal/PowerShell and run:ssh-keygen -t rsa -b 4096ssh-copy-id pi@your_pi_local_ip_or_pitunnel_addressDisabling Password Authentication
Once you've successfully set up and tested key-based authentication, you should disable password authentication on your Raspberry Pi. This prevents anyone from trying to brute-force your password. 1. SSH into your Raspberry Pi using your new key. 2. Edit the SSH daemon configuration file:sudo nano /etc/ssh/sshd_configsudo systemctl restart sshChanging Default SSH Port (Less critical with tunneling, but good practice)
While tunneling services abstract the public port, changing the internal SSH port (from 22 to something else, e.g., 2222) adds a minor layer of obscurity. It won't stop a determined attacker but can deter automated bots that only scan for port 22. 1. Edit `/etc/ssh/sshd_config` again. 2. Find the line `#Port 22` (uncomment it if it's commented out) and change `22` to your desired port (e.g., `Port 2222`). 3. Save and restart SSH service. 4. Remember to update your Pitunnel configuration (if using a local port mapping) and your SSH client command to use the new port.Keeping Your System Updated
Regularly update your Raspberry Pi's operating system and installed packages. This ensures you have the latest security patches, fixing any known vulnerabilities in OpenSSH or other system components.sudo apt update sudo apt upgrade -y sudo apt full-upgrade -y sudo apt autoremove -y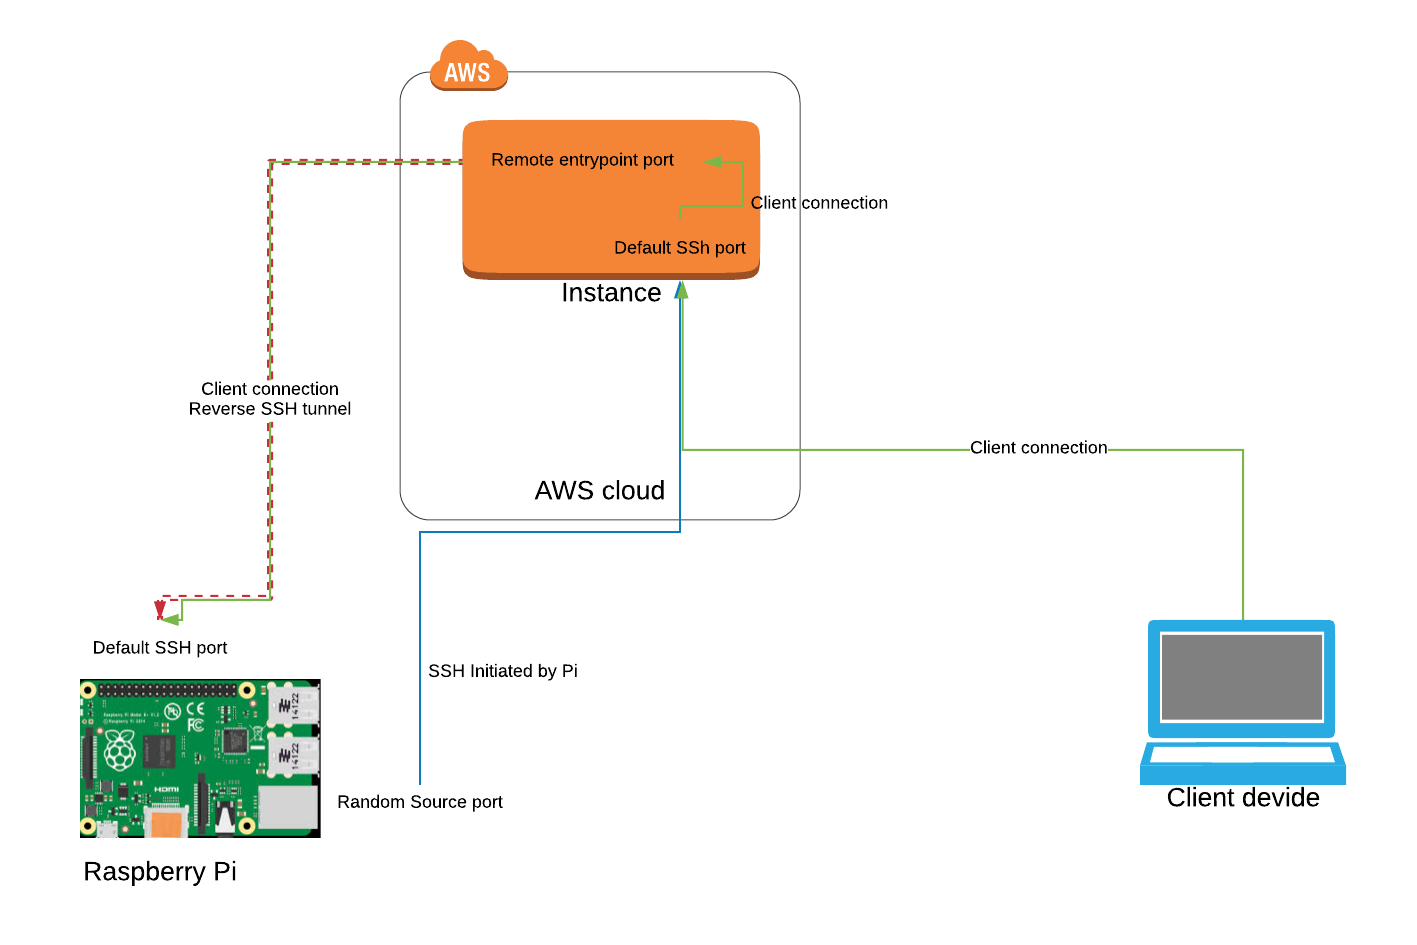

Detail Author:
- Name : Ms. Dolores Bartell
- Username : myron.ortiz
- Email : jocelyn85@yahoo.com
- Birthdate : 1998-07-13
- Address : 1897 Tillman Extension Port Gussie, ME 55554
- Phone : 1-220-760-1443
- Company : McKenzie, Morar and Wintheiser
- Job : Clinical Psychologist
- Bio : Perferendis in ut doloremque non. Sed aliquam a animi iusto vel odio. Ratione labore aliquid praesentium cumque. Quod et modi molestiae reiciendis nihil consequatur et.
Socials
linkedin:
- url : https://linkedin.com/in/garrick_id
- username : garrick_id
- bio : Ratione cupiditate laudantium maiores maiores.
- followers : 5887
- following : 594
twitter:
- url : https://twitter.com/garrick7607
- username : garrick7607
- bio : Minima ipsa fugit ex sed. Aut provident totam quod. Dolorem quia quod cum sed nostrum at.
- followers : 2558
- following : 1508
tiktok:
- url : https://tiktok.com/@garrick536
- username : garrick536
- bio : Fugiat perferendis labore consequatur voluptas voluptas natus facilis.
- followers : 4926
- following : 2203
instagram:
- url : https://instagram.com/garrick.koepp
- username : garrick.koepp
- bio : Et corporis corporis et sint et sunt. Facere et voluptas soluta asperiores quidem tenetur.
- followers : 3276
- following : 285
facebook:
- url : https://facebook.com/garrick_official
- username : garrick_official
- bio : Et et velit corporis veritatis. Officiis quo modi deleniti quod est nostrum.
- followers : 3404
- following : 2385
