Monitor Raspberry Pi Behind Firewall Without Mac: Access Your Pi Remotely
Are you struggling to monitor your Raspberry Pi behind a firewall without access to a Mac? Many users face challenges when trying to access their Raspberry Pi remotely, especially when network restrictions block traditional methods. Whether you're managing servers, running IoT devices, or simply tinkering with your Raspberry Pi, establishing a secure remote connection is essential. This guide will walk you through the process of accessing your Raspberry Pi via SSH behind a firewall without using a Mac, all while keeping the solution free and secure.
Connecting to your Raspberry Pi remotely while behind a firewall can sound like a daunting tech challenge, but don’t panic. Perhaps you’ve tried setting up port forwarding on your 4G LTE router, only to find your SIM ISP isn't allowing it, leaving you locked in a contract with no recourse. No need to debate this; many hours have been spent by users on this exact issue. Fortunately, there are alternative methods to access your Raspberry Pi without relying on port forwarding, even if you don't know the IP address of your Pi initially. In this article, we will explore effective strategies to monitor your Raspberry Pi behind a firewall without needing a Mac, ensuring you stay connected and in control.
Table of Contents
- The Challenge: Understanding Firewalls and ISP Restrictions
- Why Traditional Remote Access Methods Fail
- Preparing Your Raspberry Pi for Remote Access
- Method 1: Reverse SSH Tunneling for Secure Access
- Method 2: Leveraging VPN Solutions for Firewall Bypass
- Alternative Remote Monitoring Services
- Security Best Practices for Remote Pi Access
- Troubleshooting Common Connectivity Issues
The Challenge: Understanding Firewalls and ISP Restrictions
The primary hurdle when attempting to monitor your Raspberry Pi behind a firewall without a Mac (or Windows for that matter) stems from network security measures. Firewalls, whether they are part of your home router, a corporate network, or your Internet Service Provider's (ISP) infrastructure, are designed to control incoming and outgoing network traffic. They act as a barrier, preventing unauthorized access to devices within the private network. This is crucial for security but poses a significant challenge for remote access.
One common scenario involves ISPs that implement "Carrier-Grade Network Address Translation" (CGNAT). In such setups, multiple customers share a single public IP address, making it impossible to directly forward ports to your device. This is precisely the issue many face with 4G LTE routers where, despite the router having port forwarding capabilities, the ISP's network configuration prevents it from working. If you're locked into a contract and your ISP isn't allowing port forwarding, traditional solutions are off the table. Changing the VPN/firewall configuration can also be cumbersome if the Raspberry Pi is behind a corporate firewall which does not allow SSH or VNC connections. This quick guide will help you navigate these complexities.
Why Traditional Remote Access Methods Fail
When you want to access your Raspberry Pi remotely, the most common tools are SSH (Secure Shell) for command-line access and VNC (Virtual Network Computing) for a graphical desktop environment. These methods typically require direct incoming connections to your Raspberry Pi's IP address and a specific port. Here's why they often fail when your Raspberry Pi is behind a restrictive firewall:
- Blocked Ports: Firewalls, by default, block most incoming connections to protect the internal network. Unless a specific port (like SSH's port 22 or VNC's port 5900) is explicitly opened and forwarded, external connections cannot reach your Pi.
- Dynamic IP Addresses: Many home internet connections use dynamic IP addresses, meaning your public IP changes periodically. This makes it difficult to consistently connect to your Pi without a dynamic DNS service, which still requires port forwarding.
- NAT (Network Address Translation): Most routers use NAT to allow multiple devices on a private network to share a single public IP address. For an external connection to reach a specific device behind NAT, port forwarding rules are essential. Without them, the router doesn't know which internal device the incoming connection is intended for.
- ISP Restrictions (CGNAT): As mentioned, CGNAT prevents you from having a truly unique public IP address, rendering port forwarding impossible from your end. This is a common pain point for users trying to monitor their Raspberry Pi behind a firewall without a Mac or any other specific machine.
Struggling to connect to your Raspberry Pi via SSH when it’s hidden behind a firewall and you don’t have access to a Windows machine (or a Mac) is a common scenario. This article will guide you through the process of accessing your Raspberry Pi via SSH behind a firewall without using Windows or Mac, all while keeping the solution free and secure.
- Viral New Mms India
- Is Yasmeen Ghauris Daughter A Model
- Mallu Young Porn
- Selina Imai
- Is Richard Hy Married
Preparing Your Raspberry Pi for Remote Access
Before diving into the advanced methods, ensure your Raspberry Pi is properly set up. This foundational step is crucial for any remote access strategy, regardless of whether you're trying to monitor your Raspberry Pi behind a firewall without a Mac or any other specific client machine.
- Install Raspberry Pi OS: The Raspberry Pi OS comes in various variants for different uses. For most remote access scenarios, the "Lite" version (headless) is sufficient, saving resources. Download the Raspberry Pi Imager. Click the Raspberry Pi Imager download, follow all the instructions to flash your SD card with the desired OS.
- Enable SSH: SSH is disabled by default for security reasons. You can enable it in a few ways:
- Before First Boot (Recommended for Headless Setup): After flashing the SD card, but before inserting it into the Pi, create an empty file named `ssh` (no extension) in the boot partition of the SD card.
- After First Boot (with monitor/keyboard): Connect a monitor and keyboard, boot the Pi, open a terminal, and run `sudo raspi-config`. Navigate to "Interface Options" -> "SSH" and enable it.
- Connect to Network: Ensure your Raspberry Pi is connected to the internet, either via Wi-Fi or Ethernet. This is vital for it to establish an outbound connection to your remote server.
- Update Your Pi: It's always good practice to update your system:
sudo apt update sudo apt upgrade - Set a Static Local IP (Optional but Recommended): While not strictly necessary for the methods we'll discuss, assigning your Pi a static IP address within your local network can simplify management, especially if you ever need to access it locally.
How to set up Pi first time without a monitor: By enabling SSH before the first boot, you can configure your Pi entirely headless, which is perfect for this scenario. You don't need to know the IP address of the Pi initially, as the methods below will establish a connection without needing to directly SSH into it from your workstation.
Method 1: Reverse SSH Tunneling for Secure Access
Reverse SSH tunneling is an ingenious way to bypass firewalls that block incoming connections. Instead of you initiating a connection *to* the Raspberry Pi, the Raspberry Pi initiates an outbound connection *to* a publicly accessible server (your "jump server" or "bastion host"), creating a tunnel. You then connect to your Pi *through* this tunnel from your jump server. This method is free and highly secure, allowing you to monitor your Raspberry Pi behind a firewall without a Mac or any specific client machine.
To securely connect to your private Raspberry Pi, we need a way to bypass firewall restrictions without large security risks. An encrypted tunnel is the answer.
Setting Up Your Raspberry Pi for Reverse SSH
You'll need a publicly accessible server (e.g., a cheap VPS from DigitalOcean, Linode, Vultr, etc., or even another home computer with a public IP if you have one). Let's call this your `remote_server`.
- Generate SSH Keys on Raspberry Pi: If you haven't already, generate an SSH key pair on your Raspberry Pi. This is more secure than using passwords.
Follow the prompts. It's recommended to set a strong passphrase.ssh-keygen -t rsa -b 4096 - Copy Public Key to Remote Server: You need to copy the Pi's public key (`~/.ssh/id_rsa.pub`) to your `remote_server`'s `authorized_keys` file. This allows the Pi to connect to the `remote_server` without a password (or with a passphrase if you set one).
Replace `pi_user` with your username on the remote server and `remote_server_ip` with its IP address. If `ssh-copy-id` isn't available, you can manually append the contents of `~/.ssh/id_rsa.pub` from your Pi to `~/.ssh/authorized_keys` on your `remote_server`.ssh-copy-id pi_user@remote_server_ip - Configure SSH on Remote Server (Optional but Recommended): To allow SSH connections through the tunnel, you might need to enable `GatewayPorts` in your `remote_server`'s SSH daemon configuration (`/etc/ssh/sshd_config`). This allows remote hosts to connect to forwarded ports.
Find `GatewayPorts` and set it to `yes`. If commented out, uncomment it. Then restart the SSH service:sudo nano /etc/ssh/sshd_configsudo systemctl restart sshd
Establishing the Reverse SSH Tunnel
Now, from your Raspberry Pi, you'll initiate the connection to your `remote_server`. This command tells the Pi to open a port on the `remote_server` and forward traffic from that port back to the Pi's local SSH port (22).
ssh -N -R 2222:localhost:22 pi_user@remote_server_ip- `-N`: Do not execute a remote command. This is useful for just forwarding ports.
- `-R 2222:localhost:22`: This is the crucial part. It tells the `remote_server` to listen on port `2222`. Any connection to `remote_server:2222` will be forwarded back through the tunnel to `localhost:22` on the Raspberry Pi. You can choose any unused port on your `remote_server` (e.g., 2222, 3000, 8080).
- `pi_user@remote_server_ip`: Your username and IP address for the remote server.
To make this connection persistent, especially if your Pi reboots or the connection drops, you can use `autossh` or a systemd service. `autossh` is highly recommended as it monitors the SSH connection and restarts it if it fails.
- Install autossh on Raspberry Pi:
sudo apt install autossh - Run the tunnel with autossh:
The `-M 0` disables the monitoring port, as we rely on the SSH connection itself.autossh -M 0 -N -R 2222:localhost:22 pi_user@remote_server_ip
Now, from any computer (your Mac, Windows PC, Linux machine, or even another Raspberry Pi) that can access your `remote_server`, you can SSH into your Raspberry Pi:
ssh pi@remote_server_ip -p 2222Replace `pi` with your Raspberry Pi's username and `remote_server_ip` with your remote server's IP address. The `-p 2222` specifies the port on the remote server that is tunneling to your Pi. This is how you learn how to SSH to Raspberry Pi behind a firewall without port forward, and crucially, without needing a Mac for the client side.
Method 2: Leveraging VPN Solutions for Firewall Bypass
Another robust method to monitor your Raspberry Pi behind a firewall without a Mac is to use a Virtual Private Network (VPN). A VPN creates an encrypted tunnel between your Raspberry Pi and a VPN server, making your Pi appear as if it's on the same network as the VPN server. This bypasses firewall restrictions because the connection is outbound from the Pi to the VPN server, which is usually allowed.
Exposing SSH or VNC on your Raspberry Pi over the open internet is risky. Within a VPN, or using an external service like RealVNC’s Cloud VNC Viewer, offers much better security. We'll focus on VPNs here.
Configuring a VPN on Your Raspberry Pi
You can use a commercial VPN service or set up your own VPN server (e.g., OpenVPN, WireGuard) on a public cloud instance. Setting up your own VPN server gives you full control and is often more cost-effective for long-term use.
- Choose a VPN Solution:
- Commercial VPN: Many services offer client software for Linux, including Raspberry Pi OS. This is often the easiest to set up.
- Self-Hosted VPN (OpenVPN/WireGuard): More complex to set up initially, but provides maximum control and privacy. You'll need a public server to host the VPN server.
- Install VPN Client on Raspberry Pi:
- OpenVPN:
Then, you'll typically download a configuration file (`.ovpn`) from your VPN provider or your self-hosted server and connect using:sudo apt install openvpn
For automatic startup, configure it as a systemd service.sudo openvpn --config /path/to/your/config.ovpn - WireGuard: WireGuard is newer, faster, and often simpler.
Configuration involves creating keys and setting up interface files (`/etc/wireguard/wg0.conf`).sudo apt install wireguard
- OpenVPN:
- Configure VPN to Auto-Start: Ensure your VPN client starts automatically on boot. For OpenVPN, you can enable the service:
(where `your_config_name` is the name of your `.ovpn` file without the extension). For WireGuard, it's typically:sudo systemctl enable openvpn@your_config_namesudo systemctl enable wg-quick@wg0
Accessing Your Pi via the VPN
Once your Raspberry Pi is connected to the VPN, it will obtain an IP address within the VPN's private network. Your client device (Mac, Windows, Linux) will also need to connect to the same VPN server or network.
- Connect Your Client Device to the VPN: Install the appropriate VPN client on your Mac (or other device) and connect to the same VPN server that your Raspberry Pi is using.
- Access the Pi's VPN IP: Once both your client and the Raspberry Pi are connected to the VPN, they will be on the same virtual network. You can then SSH into your Raspberry Pi using its VPN-assigned IP address.
You can find the Raspberry Pi's VPN IP address by running `ip a` on the Pi after the VPN connects (look for the IP address associated with the VPN interface, e.g., `tun0` for OpenVPN or `wg0` for WireGuard).ssh pi@raspberry_pi_vpn_ip
A crucial point: Because the Pi has an IP address on the VPN, you can log into it from the workstation that is also connected to the same VPN. This method effectively bypasses local firewalls and ISP restrictions by creating a secure, private network tunnel.
Alternative Remote Monitoring Services
While reverse SSH and self-hosted VPNs offer maximum control and are free (aside from VPS costs), several third-party services provide cloud-based remote access solutions. These can be particularly useful if you prefer a simpler, managed solution, though they may come with subscription fees.
- RealVNC Connect (Cloud VNC Viewer): RealVNC offers a cloud-based service that allows you to connect to your Raspberry Pi from anywhere without needing port forwarding or complex network configurations. The Pi connects outbound to the RealVNC cloud, and your client device connects to the same cloud, creating a secure tunnel. This is a great option for graphical desktop access to monitor your Raspberry Pi behind a firewall without a Mac or any other specific client.
- TeamViewer: TeamViewer is a popular remote desktop solution that also works by initiating outbound connections from the client and host to a central server. You install the TeamViewer host on your Raspberry Pi, and then you can connect from any TeamViewer client. The TeamViewer service handles the firewall traversal. However, keep in mind that for accessing the Pi itself, the TeamViewer client must be running on the Pi, and you'll connect to the Pi's TeamViewer ID. You can only access the devices behind it if you set up specific routing, but for direct Pi access, it's straightforward.
- Ngrok/LocalTunnel: These services create secure tunnels from your local network to the internet, providing a public URL for your local service (like SSH). While convenient for quick, temporary access, they might not be ideal for continuous, secure monitoring due to potential rate limits or less robust security features compared to dedicated VPNs or reverse SSH with strong key management.
These services abstract away much of the networking complexity, making them user-friendly. However, always evaluate their security practices and privacy policies before entrusting them with access to your Raspberry Pi.
Security Best Practices for Remote Pi Access
When you monitor your Raspberry Pi behind a firewall without a Mac using remote access methods, security is paramount. Bypassing firewalls, even securely, means you're creating a path to your device. Here are essential security practices:
- Use SSH Key Authentication: Always use SSH keys instead of passwords for SSH connections. Disable password authentication for SSH on your Pi and your remote server. This significantly reduces the risk of brute-force attacks.
- Strong Passphrases for SSH Keys: Even with key authentication, protect your private keys with strong, unique passphrases.
- Change Default Passwords/Usernames: Immediately change the default 'pi' user password on your Raspberry Pi. Consider creating a new user and disabling the 'pi' user entirely for remote access.
- Regular Updates: Keep your Raspberry Pi OS and all installed software up to date (`sudo apt update && sudo apt upgrade`). This patches security vulnerabilities.
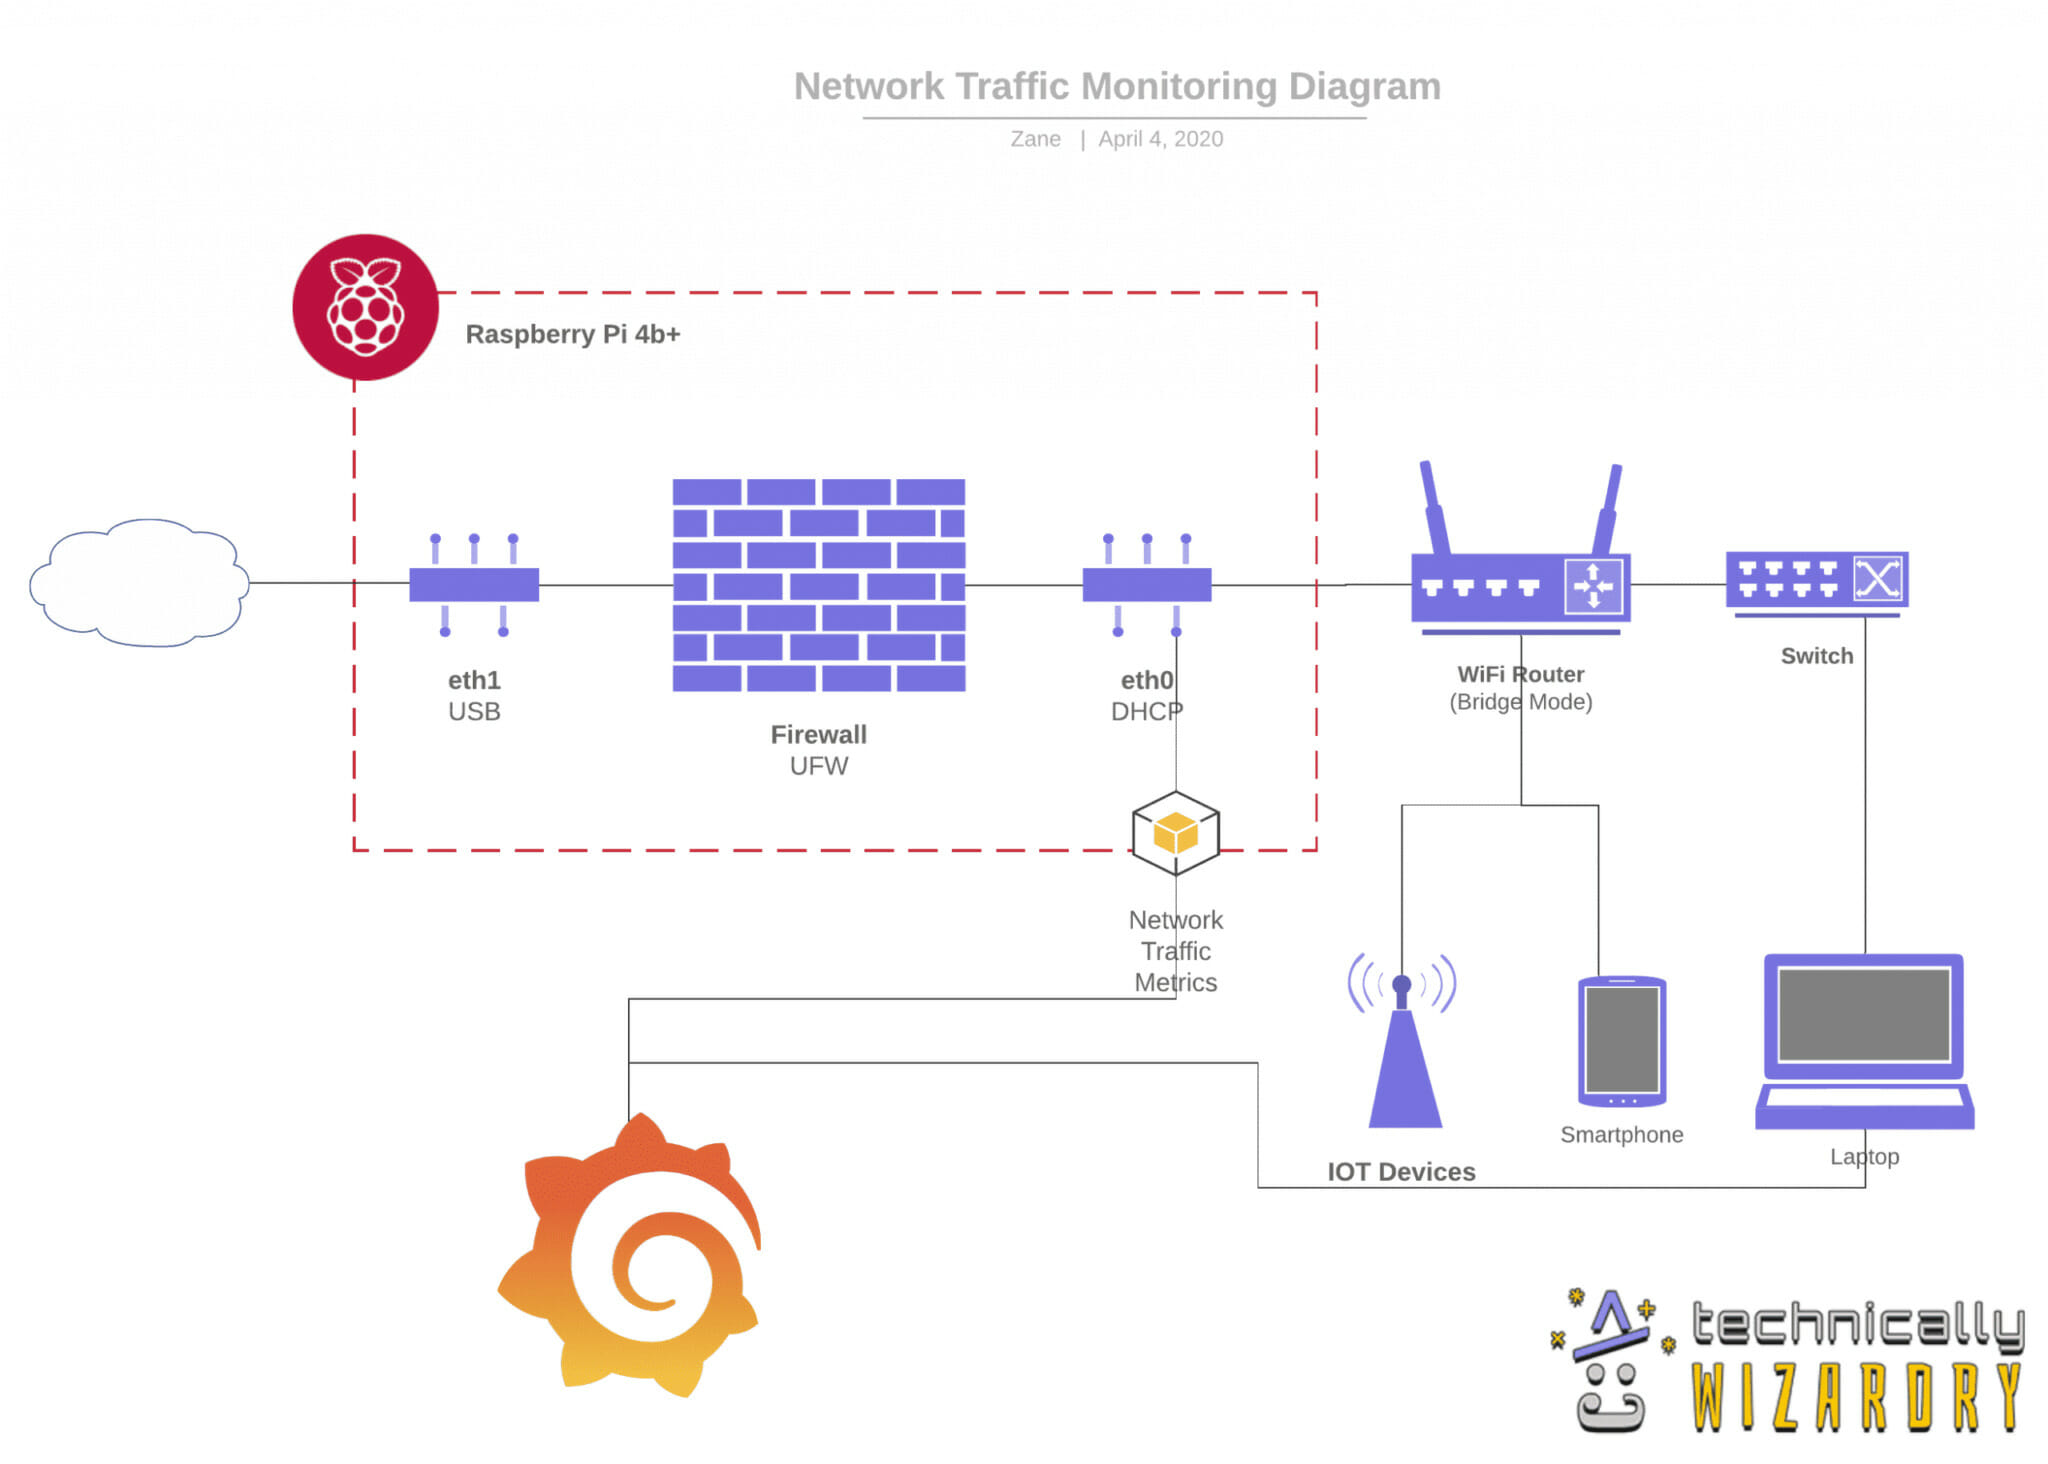
- Firewall on Raspberry Pi (UFW): Even though your Pi is behind a firewall, configure a local firewall (like UFW - Uncomplicated Firewall) on the Pi itself. This adds an extra layer of defense, only allowing necessary connections (e.g., SSH from localhost if using reverse SSH, or from VPN interface if using VPN).
sudo apt install ufw sudo ufw enable sudo ufw allow ssh # Or specific ports for services you need - Limit User Privileges: Only use `sudo` when absolutely necessary. Avoid logging in as root directly.
- Monitor Logs: Regularly check your Pi's system logs (`/var/log/auth.log` for SSH attempts) for any suspicious activity.
- Two-Factor Authentication (2FA): If your remote server or VPN service supports it, enable 2FA for an added layer of security.
Implementing these practices will help ensure that your Raspberry Pi remains secure, even when accessible remotely, providing peace of mind as you monitor your Raspberry Pi behind a firewall without a Mac.
Troubleshooting Common Connectivity Issues
Even with the best planning, you might encounter issues when trying to monitor your Raspberry Pi behind a firewall without a Mac. Here are some common problems and their solutions:
- "Connection refused" or "Connection timed out":
- SSH not running: Ensure SSH is enabled and running on your Raspberry Pi (`sudo systemctl status ssh`).
- Firewall blocking: Check UFW on your Pi and any firewalls on your remote server. For reverse SSH, ensure `GatewayPorts yes` is set on the remote server's `sshd_config`.
- Incorrect port: Double-check the port number you're trying to connect to on the remote server (e.g., `2222` for reverse SSH).
- VPN not connected: If using a VPN, ensure both your client and the Pi are successfully connected to the VPN and have obtained IP addresses within the VPN network.
- "Permission denied (publickey)":
- Incorrect SSH key setup: Verify that the public key from your Pi is correctly added to the `authorized_keys` file on your remote server. Ensure permissions on `~/.ssh` and `authorized_keys` are correct (e.g., `chmod 700 ~/.ssh`, `chmod 600 ~/.ssh/authorized_keys`).
- Wrong username: Ensure you're using the correct username for both the remote server (when the Pi connects) and the Pi itself (when you connect through the tunnel).
- Passphrase issue: If your key has a passphrase, ensure you're entering it correctly.
- Tunnel drops frequently:
- Network instability: Unstable internet connections on either the Pi or the remote server can cause drops.
- SSH timeout: Configure `ServerAliveInterval` and `ClientAliveInterval` in your SSH client/server configurations to send keep-alive messages. `autossh` is designed to handle this by automatically re-establishing the tunnel.
- "I don't know the IP address of Pi":
- For reverse SSH, you don't need the Pi's public IP. You connect to your remote server's public IP on the forwarded port.


Detail Author:
- Name : Dr. Lea Turcotte
- Username : nola99
- Email : johnpaul39@hotmail.com
- Birthdate : 1972-10-31
- Address : 3919 Yasmin Lane New Conor, AL 41621
- Phone : 1-458-957-2093
- Company : Pagac LLC
- Job : Philosophy and Religion Teacher
- Bio : Ut dolor soluta incidunt quis enim. Rerum occaecati voluptatem ut ut repellendus distinctio consequatur sit. Non odio minima magni. Sit asperiores laborum maxime in qui.
Socials
twitter:
- url : https://twitter.com/nels_schultz
- username : nels_schultz
- bio : Est hic aut et. Debitis dolores velit officiis cumque odio quia autem. Voluptatem ut libero dolores aut. Et autem ratione inventore maxime dolor maxime.
- followers : 6405
- following : 2480
tiktok:
- url : https://tiktok.com/@nels.schultz
- username : nels.schultz
- bio : Quidem soluta repellat excepturi qui voluptatem quam et velit.
- followers : 5395
- following : 933
linkedin:
- url : https://linkedin.com/in/schultz1990
- username : schultz1990
- bio : Rerum cumque quam non et deleniti error earum.
- followers : 4925
- following : 2501
