Unlock Remote IoT: Secure Raspberry Pi Access Via Free VPC SSH
In today's rapidly evolving technological landscape, the ability to manage devices remotely has become not just a convenience, but a necessity. For enthusiasts, developers, and professionals alike, mastering **remote IoT VPC SSH Raspberry Pi free** is a crucial skill. Whether you're setting up a home automation system, managing industrial IoT devices, or simply want to tinker with your Raspberry Pi from afar, the challenges of security and complexity often loom large. This comprehensive guide will walk you through the process in detail, ensuring that your setup is both robust and secure, without incurring additional costs.
Imagine being able to send commands, deploy updates, or monitor your IoT devices from anywhere in the world, without the hassle of discovering device IPs or wrestling with complex firewall settings. This isn't just a dream; it's entirely achievable. By leveraging the power of Virtual Private Clouds (VPC), Secure Shell (SSH), and the versatile Raspberry Pi, you can create a secure and efficient environment to control your IoT devices from anywhere. This guide will delve into everything you need to know about setting up secure, free remote access to your Raspberry Pi for your IoT projects.
Table of Contents
- Understanding the Core Concepts: Remote IoT, VPC, SSH, and Raspberry Pi
- Why Remote IoT VPC SSH on Raspberry Pi is a Game-Changer (and Free!)
- Preparing Your Raspberry Pi for Remote Access
- Setting Up Your Free AWS VPC for Remote IoT
- Establishing a Secure SSH Connection to Your Raspberry Pi via VPC
- Advanced Remote IoT Management: Commands, Automation, and Security Best Practices
- Troubleshooting Common Issues and Optimizing Your Setup
- Expanding Your Remote IoT Horizons: Beyond the Basics
- Conclusion
Understanding the Core Concepts: Remote IoT, VPC, SSH, and Raspberry Pi
Before we dive into the practical steps of setting up **remote IoT VPC SSH Raspberry Pi free**, it's essential to grasp the fundamental components that make this powerful solution possible. Each element plays a critical role in creating a secure, accessible, and efficient remote management system for your internet-connected devices.
- John Cusack Partner
- Reggie Miller Married
- Desi Viral Hidden Mms
- Dolphy Family Tree
- Camilla Araujo Nude Video
What is Remote IoT Management?
Remote IoT management refers to the ability to control, monitor, and interact with Internet of Things (IoT) devices from a location different from where the devices are physically situated. This could mean controlling smart home devices from your office, managing sensor networks in a remote agricultural field, or updating firmware on industrial machinery from a central control room. The core benefit is flexibility and efficiency, allowing you to manage a distributed network of devices without needing physical presence. This is particularly vital for deployments where devices are numerous, geographically dispersed, or difficult to access.
The Power of Virtual Private Clouds (VPC)
A Virtual Private Cloud (VPC) is a virtual network dedicated to your AWS account. It's logically isolated from other virtual networks in the AWS Cloud, providing you with complete control over your virtual networking environment. This includes selecting your own IP address range, creating subnets, and configuring route tables and network gateways. In the context of remote IoT, a VPC acts as a secure, private network where your Raspberry Pi (or other IoT devices) can reside and communicate securely with your management tools. This setup ensures that your IoT devices remain safe, isolated from the public internet, and only accessible through defined, secure channels. Using a VPC is a cornerstone for building a robust and secure remote access solution.
Secure Shell (SSH): Your Remote Command Line
In the context of Raspberry Pi and remote IoT, SSH (Secure Shell) is the cornerstone for secure remote access. SSH is a cryptographic network protocol for operating network services securely over an unsecured network. It provides a secure channel over an unsecured network by using a client-server architecture, connecting an SSH client application with an SSH server. For our purposes, it means you can securely log into your Raspberry Pi from a remote computer, execute commands, transfer files, and manage your device as if you were sitting right in front of it. By setting up SSH on your Raspberry Pi, you can remotely access and manage it from any location with an internet connection, making it an indispensable tool for remote development and management.
Raspberry Pi: The IoT Workhorse
The Raspberry Pi is a series of small single-board computers (SBCs) developed in the United Kingdom by the Raspberry Pi Foundation to promote the teaching of basic computer science in schools and developing countries. However, its low cost, small size, and versatility have made it incredibly popular for a wide range of applications, especially in the IoT space. It can run various Linux distributions, connect to a multitude of sensors and actuators via its GPIO pins, and serve as a lightweight server. By utilizing Raspberry Pi as a lightweight server and configuring it within an AWS VPC, you can establish a robust SSH connection that ensures data privacy and control, making it an ideal candidate for **remote IoT VPC SSH Raspberry Pi free** projects.
Why Remote IoT VPC SSH on Raspberry Pi is a Game-Changer (and Free!)
The combination of a Raspberry Pi, a Virtual Private Cloud, and SSH for remote IoT management is more than just a technical setup; it's a paradigm shift for anyone working with connected devices. The ability to achieve this securely and without ongoing costs, thanks to services like AWS Free Tier, makes it incredibly appealing.
Firstly, consider the convenience. No longer do you need to discover the IoT device's IP address, deal with dynamic IP changes, or configure complex port forwarding rules on your home router, which can be a security nightmare. RemoteIoT VPC SSH is essentially a secure tunnel that connects your Raspberry Pi to an AWS Virtual Private Cloud (VPC). This setup ensures that your IoT devices remain safe and accessible via a private network, rather than being exposed directly to the public internet. This significantly reduces the attack surface and simplifies network management.
Secondly, the security aspect cannot be overstated. Traditional methods of remote access often involve opening ports, which can leave your network vulnerable. With a VPC, your Raspberry Pi communicates within a controlled, isolated environment. SSH itself provides strong encryption, protecting your data and commands from eavesdropping. This robust security framework is paramount, especially when dealing with sensitive IoT data or critical infrastructure.
Finally, the "free" aspect is a massive draw. By strategically using the AWS Free Tier, you can often run a small VPC and associated services necessary for this setup without incurring charges. This makes it an incredibly accessible solution for hobbyists and startups who need powerful remote management capabilities without a hefty budget. Secure, free remote access to your Raspberry Pi for IoT projects is achievable, empowering you to innovate without financial barriers.
Preparing Your Raspberry Pi for Remote Access
Before your Raspberry Pi can become a remotely managed IoT powerhouse, it needs some foundational setup. This section covers the essential steps to get your Raspberry Pi ready for its role in a **remote IoT VPC SSH Raspberry Pi free** environment.
- Install Raspberry Pi OS: Start by flashing the latest version of Raspberry Pi OS (formerly Raspbian) onto your microSD card. You can use the Raspberry Pi Imager tool, which makes this process straightforward. Choose the "Lite" version if you don't need a desktop environment, as it consumes fewer resources, which is ideal for headless IoT applications.
- Initial Boot and Updates: Insert the microSD card into your Raspberry Pi, connect it to power, and if you're using a desktop version, connect a monitor, keyboard, and mouse. For a headless setup, you might need to enable SSH during the imaging process or by creating a file named `ssh` (no extension) in the boot partition of the SD card. Once booted, open a terminal and run the following commands to update your system:
This ensures your system is up-to-date with the latest security patches and software.sudo apt update sudo apt full-upgrade -y - Enable SSH: SSH is often disabled by default for security reasons. You can enable it via the Raspberry Pi configuration tool:
Navigate to "Interface Options" -> "SSH" and select "Yes" to enable it. If you're setting up headless, as mentioned, creating an `ssh` file in the boot partition before the first boot will enable it automatically.sudo raspi-config - Change Default Password (Crucial!): The default password for the 'pi' user is 'raspberry'. This is a major security risk. Change it immediately using:
Follow the prompts to set a strong, unique password. Better yet, consider creating a new user and disabling the 'pi' user, or even disabling password-based SSH login in favor of SSH key authentication for enhanced security.passwd - Static IP Address (Optional but Recommended for Local Network): While our VPC setup will bypass the need for a public static IP, assigning a static IP on your local network can simplify initial setup and local debugging. This is configured in your network settings or router.
With these steps completed, your Raspberry Pi is now a robust base, ready to be integrated into a secure VPC environment for seamless remote management.
Setting Up Your Free AWS VPC for Remote IoT
This is where the "VPC" in **remote IoT VPC SSH Raspberry Pi free** comes into play. We'll leverage Amazon Web Services (AWS) Free Tier to create a secure, isolated network for your Raspberry Pi. While AWS offers a vast array of services, we'll focus on the core components needed for our secure tunnel.
- Create an AWS Account: If you don't have one, sign up for an AWS account. Be sure to understand the AWS Free Tier limits to ensure your usage remains free. For a single Raspberry Pi setup, you're highly unlikely to exceed these limits for VPC and associated services.
- Create a New VPC:
- Log in to the AWS Management Console.
- Navigate to the VPC service (you can search for "VPC" in the search bar).
- Click "Create VPC".
- Choose "VPC and more" for a quick setup. Give your VPC a name (e.g., `IoT-VPC`), choose a CIDR block (e.g., `10.0.0.0/16`), and select a single public subnet. This will automatically create an Internet Gateway, a Route Table, and a Security Group. For our purposes, a single public subnet is sufficient as our Raspberry Pi will initiate the connection to a public endpoint, but its traffic will be routed securely within the VPC.
- Click "Create VPC".
- Configure Security Group: The security group acts as a virtual firewall for your VPC.
- In the VPC dashboard, go to "Security Groups".
- Find the security group created with your VPC (it will likely have a name like `IoT-VPC-sg`).
- Edit the inbound rules: You'll need to allow SSH traffic (port 22) from your specific public IP address or a known range. This is crucial for you to connect to the EC2 instance that will act as your SSH bastion host or tunnel endpoint within the VPC. Never allow SSH from `0.0.0.0/0` (anywhere) unless absolutely necessary and with extreme caution.
- You might also need to allow outbound traffic from your Raspberry Pi to the internet (e.g., port 80/443 for updates or API calls).
- Launch an EC2 Instance (Bastion Host): This EC2 instance will be the entry point into your VPC for SSH connections. Your Raspberry Pi will connect *out* to this instance.
- Navigate to the EC2 service.
- Click "Launch Instance".
- Choose an Amazon Machine Image (AMI) that is eligible for the free tier (e.g., Amazon Linux 2 AMI or Ubuntu Server 20.04 LTS).
- Select an instance type eligible for the free tier (e.g., `t2.micro`).
- In "Network settings", select your newly created VPC and its public subnet. Ensure "Auto-assign public IP" is enabled.
- Create a new key pair (e.g., `iot-ssh-key`). Download the `.pem` file and keep it secure; you'll need this to connect to your EC2 instance.
- Configure storage (default 8GB is fine for free tier).
- Launch the instance. Note its Public IPv4 address once it's running.
This AWS setup creates a secure, isolated network with a publicly accessible entry point (your EC2 bastion host). Your Raspberry Pi will establish a reverse SSH tunnel to this bastion host, effectively making it accessible within your private VPC network. This is the core mechanism behind establishing **remote IoT VPC SSH Raspberry Pi free** access.
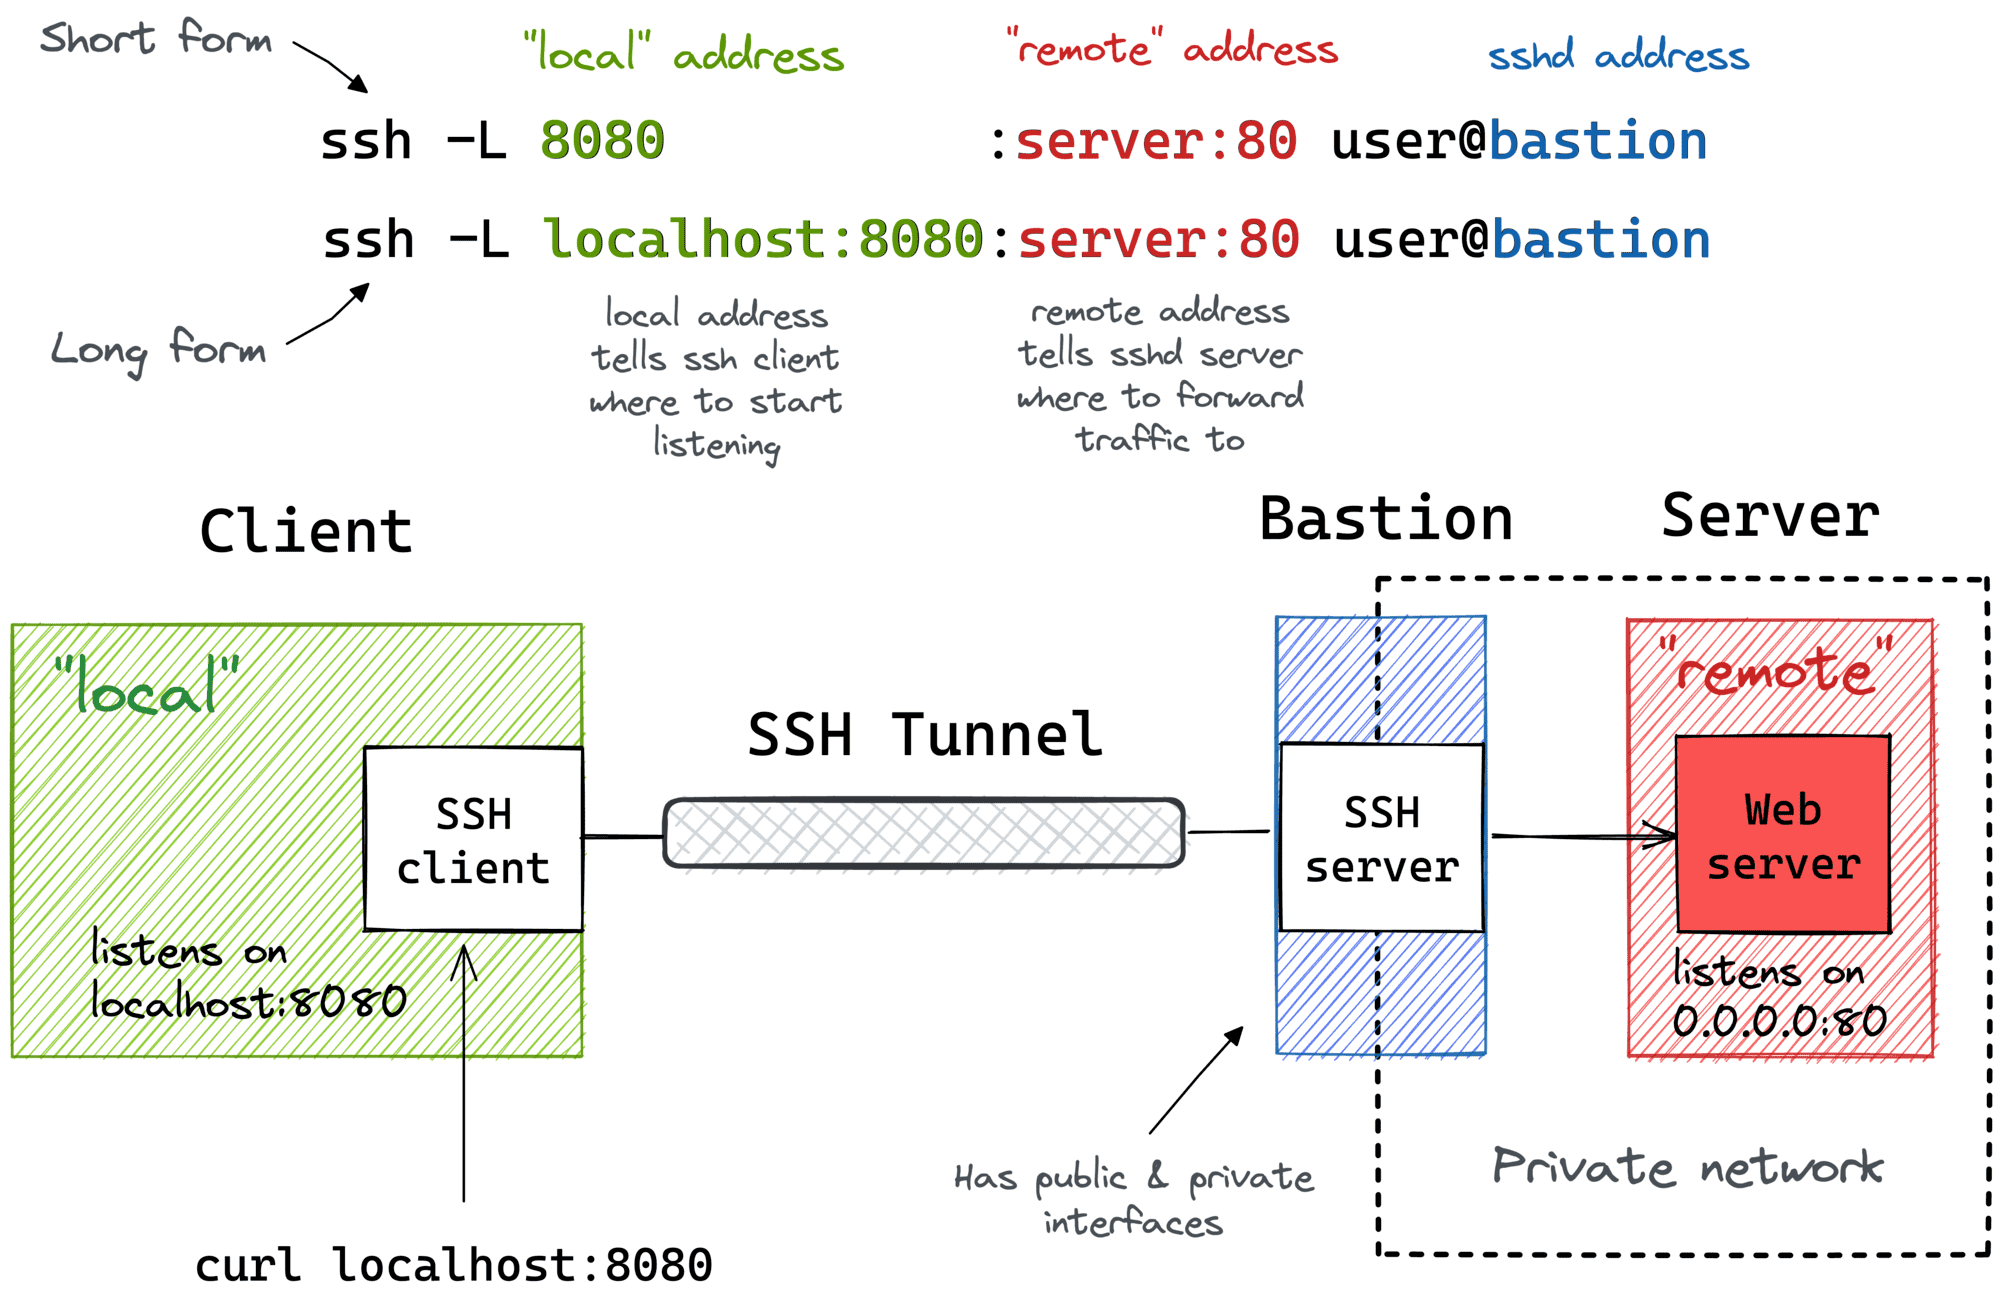
Establishing a Secure SSH Connection to Your Raspberry Pi via VPC
Now that your Raspberry Pi is prepared and your AWS VPC is configured, it's time to establish the secure connection that enables **remote IoT VPC SSH Raspberry Pi free** access. The key here is a "reverse SSH tunnel," where your Raspberry Pi initiates an outbound connection to your EC2 bastion host in the VPC, creating a persistent tunnel that you can then use to access the Pi.
- Generate SSH Key Pair on Raspberry Pi (Optional, but Recommended for Security): While you can use password authentication for the reverse tunnel, using SSH keys is far more secure.
Follow the prompts. Do not set a passphrase if you want the Pi to connect automatically on boot (though a passphrase adds security if you're comfortable entering it).ssh-keygen -t rsa -b 4096 -C "raspberrypi-iot-key" - Copy Raspberry Pi's Public Key to EC2 Bastion Host: You need to add the public key generated on your Raspberry Pi (`~/.ssh/id_rsa.pub`) to the `authorized_keys` file on your EC2 bastion host. First, get the public key from your Pi:
Copy the entire output. Then, SSH into your EC2 bastion host using the `.pem` key you downloaded earlier:cat ~/.ssh/id_rsa.pub
Once logged in, edit the `authorized_keys` file:ssh -i /path/to/your/iot-ssh-key.pem ec2-user@YOUR_EC2_PUBLIC_IP
Paste the Raspberry Pi's public key on a new line, save, and exit.nano ~/.ssh/authorized_keys - Establish the Reverse SSH Tunnel from Raspberry Pi: This command needs to be run on your Raspberry Pi. It tells the Pi to connect to your EC2 instance and open a local port (e.g., 2222) on the EC2 instance, which will forward traffic to port 22 (SSH) on the Raspberry Pi.
* `-N`: Do not execute a remote command (just forward ports). * `-R 2222:localhost:22`: This is the reverse tunnel. It maps port 2222 on the remote host (EC2) to port 22 on the local host (Raspberry Pi). * `ec2-user@YOUR_EC2_PUBLIC_IP`: Replace with your EC2 user and public IP. * `-i /path/to/your/iot-ssh-key.pem`: Path to the private key on your Raspberry Pi that corresponds to the public key you added to the EC2 instance. * `-o "ExitOnForwardFailure yes"`: Ensures the SSH client exits if the tunnel cannot be established. You might want to make this command run automatically on boot (e.g., via a systemd service or cron job) and ensure it reconnects if the connection drops.ssh -N -R 2222:localhost:22 ec2-user@YOUR_EC2_PUBLIC_IP -i /path/to/your/iot-ssh-key.pem -o "ExitOnForwardFailure yes" - Access Your Raspberry Pi from Your Local Machine: Now, from your local computer, you can SSH into your Raspberry Pi via the EC2 bastion host's forwarded port:
* `-i /path/to/your/iot-ssh-key.pem`: This is the private key for your EC2 instance (the one you downloaded from AWS). * `pi@YOUR_EC2_PUBLIC_IP`: The username for your Raspberry Pi (usually 'pi') and the public IP of your EC2 instance. * `-p 2222`: Specifies the port on the EC2 instance that is forwarding to your Pi.ssh -i /path/to/your/iot-ssh-key.pem pi@YOUR_EC2_PUBLIC_IP -p 2222
Congratulations! You've now established a secure, remote SSH connection to your Raspberry Pi through your AWS VPC. This setup allows you to manage your Pi from anywhere in the world, embodying the essence of **remote IoT VPC SSH Raspberry Pi free**.
Advanced Remote IoT Management: Commands, Automation, and Security Best Practices
With your **remote IoT VPC SSH Raspberry Pi free** setup in place, you're ready to unlock its full potential. Beyond simple command-line access, this secure tunnel opens doors to advanced management techniques, automation, and critical security enhancements.
Sending Commands and Batch Jobs to Raspberry Pi from Web Portal
Once you have SSH access, you can automate almost anything. For sending commands and batch jobs, you can write scripts (e.g., Bash or Python) on your Raspberry Pi and execute them remotely.
- Direct Execution: From your local machine, you can execute a single command on your Pi without fully logging in:
ssh -i /path/to/your/ec2-key.pem pi@YOUR_EC2_PUBLIC_IP -p 2222 "ls -l /home/pi/iot_data/" - Script Execution: For complex tasks, write a script on your Pi (e.g., `update_sensors.sh`) and then execute it remotely:
ssh -i /path/to/your/ec2-key.pem pi@YOUR_EC2_PUBLIC_IP -p 2222 "bash /home/pi/scripts/update_sensors.sh" - Web Portal Integration: For a more user-friendly interface, you can build a simple web portal (e.g., using Flask or Node.js) on a separate server (or even on your EC2 bastion host if it's powerful enough, though not recommended for production) that triggers SSH commands. This portal would use a library (like `paramiko` in Python) to connect to your EC2 instance and then forward commands to your Raspberry Pi via the tunnel. This allows you to "send command and batch job to Raspberry Pi from web portal," abstracting the SSH complexity from end-users.
- Support for All Linux Machines and TCP Services: The beauty of SSH tunneling is its versatility. This setup supports all Linux machines, not just Raspberry Pi. Moreover, it can tunnel any TCP service. For example, if you're running a web server on port 8080 on your Pi, you could create another reverse tunnel: `-R 8888:localhost:8080`. Then, from your local machine, you could access `http://YOUR_EC2_PUBLIC_IP:8888` to reach your Pi's web server. This means you can securely access web interfaces, databases, or any other TCP service running on your Pi.
Security Best Practices:
While the VPC and SSH provide a strong security foundation, continuous vigilance is key.
- SSH Key Authentication Only: Disable password authentication for SSH on both your Raspberry Pi and your EC2 instance. Rely solely on strong SSH key pairs. To do this on your Raspberry Pi (and EC2): Edit `/etc/ssh/sshd_config`, find `PasswordAuthentication yes` and change it to `PasswordAuthentication no`. Then restart the SSH service: `sudo systemctl restart ssh`.
- Restrict SSH Access (EC2 Security Group): Ensure your EC2 instance's security group only allows SSH (port 22) from your specific IP address or a very limited set of trusted IPs. This is your primary defense.
- Regular Updates: Keep your Raspberry Pi OS and all installed software up-to-date.
sudo apt update && sudo apt full-upgrade -y - Firewall on Raspberry Pi: Implement a local firewall (e.g., UFW - Uncomplicated Firewall) on your Raspberry Pi to restrict incoming connections even further, only allowing what's absolutely necessary.
sudo apt install ufw sudo ufw enable sudo ufw allow ssh # If you need local SSH access sudo ufw deny incoming # Block all other incoming by default - Monitor Logs: Regularly check SSH logs (`/var/log/auth.log`) on both your Pi and EC2 instance for suspicious activity.
- Dedicated SSH User: For automation tasks, create a dedicated SSH user on your Pi with limited permissions, rather than using the 'pi' user or root.
By implementing these advanced management techniques and adhering to security best practices, your **remote IoT VPC SSH Raspberry Pi free** setup will not only be functional but also resilient and secure against potential threats.
Troubleshooting Common Issues and Optimizing Your Setup
Even with a clear guide, technical setups can sometimes present challenges. Here are some common issues you might encounter with your **remote IoT VPC SSH Raspberry Pi free** configuration and how to resolve them, along with tips for optimization.
Common Troubleshooting Scenarios:
- SSH Connection Refused (Port 2222 on EC2):
- Cause: The reverse tunnel from your Raspberry Pi to the EC2 instance is not established or has dropped.
- Solution: Check the Raspberry Pi. Is the `ssh -N -R` command still running? Did the Pi lose internet connectivity? Is the EC2 instance running? Check the EC2 instance's security group to ensure port 22 is open for your Pi's outbound connection (though usually outbound is allowed by default). Ensure the SSH key on the Pi is correctly added to `authorized_keys` on the EC2 instance.
- SSH Connection Timed Out (Connecting to EC2):
- Cause: Your local machine cannot reach the EC2 instance.
- Solution: Verify the EC2 instance's public IP address. Check your local internet connection. Most importantly, check the EC2 instance's security group inbound rules. Is port 22 open for your local machine's public IP address?
- Permission Denied (Public Key):
- Cause: Incorrect SSH key usage or permissions.
- Solution: Ensure the `.pem` file for your EC2 instance has correct permissions (`chmod 400 /path/to/your/key.pem`). Double-check that the correct public key from your Pi is in the `authorized_keys` file on the EC2 instance, and vice-versa if you're connecting from your local machine.
- Reverse Tunnel Drops Frequently:
- Cause: Network instability, SSH timeout settings, or Pi going to sleep.
- Solution:
- Add `ServerAliveInterval 60` and `ServerAliveCountMax 3` to your Raspberry Pi's `~/.ssh/config` file (or directly to the `ssh` command using `-o` flags). This sends keep-alive messages.
- Ensure your Raspberry Pi's power supply is stable.
- Implement a script to automatically restart the reverse tunnel if it drops (e.g., using `systemd` or a simple `while true; do ...; sleep 5; done` loop).
- "No need to discover the IoT device IP and change any firewall settings" - How?
- Clarification: This is achieved because your Raspberry Pi initiates the connection *outbound* to the EC2 instance. Most home/corporate firewalls allow outbound connections by default. The EC2 instance has a static public IP. Your Pi doesn't need a public IP, and you don't need to open inbound ports on your home router. This is the core advantage of the reverse tunnel.
Optimization Tips:
- Minimize Raspberry Pi Resource Usage: For headless IoT projects, remove unnecessary services and desktop environments to free up RAM and CPU. This ensures your Pi runs smoothly and reliably.
- Automate Tunnel Reconnection: Use `systemd` on your Raspberry Pi to manage the reverse SSH tunnel. Create a service file that ensures the tunnel is always up and automatically restarts if it fails. This is crucial for maintaining continuous remote access.
- Use a Dedicated SSH User for Tunnel: Instead of `ec2-user`, create a specific user on your EC2 instance for the reverse tunnel. This user should have very limited permissions, enhancing security.
- Monitor AWS Free Tier Usage: Regularly check your AWS billing dashboard to ensure you're staying within the Free Tier limits, especially for EC2 instance hours and data transfer.
By understanding these common pitfalls and applying optimization strategies, you can maintain a robust and reliable **remote IoT VPC SSH Raspberry Pi free** setup, ensuring your IoT projects remain accessible and manageable.
Expanding Your Remote IoT Horizons: Beyond the Basics
The **remote IoT VPC


Detail Author:
- Name : Abdiel Goldner
- Username : sonia.zulauf
- Email : nils27@daugherty.com
- Birthdate : 1988-09-24
- Address : 2959 Fritsch Grove Turcotteland, IL 63747
- Phone : 1-909-603-5915
- Company : Langosh LLC
- Job : Plant and System Operator
- Bio : Illum laboriosam modi omnis odio. Reprehenderit quia molestiae aut. Aut porro dolorem incidunt. Sed nam vero iure voluptates rerum quasi sunt. Fugit quis dolor eaque consequatur.
Socials
facebook:
- url : https://facebook.com/sonny_xx
- username : sonny_xx
- bio : Nesciunt fugit et aut voluptatibus et laudantium aspernatur.
- followers : 603
- following : 1085
instagram:
- url : https://instagram.com/ssanford
- username : ssanford
- bio : Ut culpa sit similique quis animi. Ipsum quasi at vel praesentium.
- followers : 1800
- following : 422
