Securely Access Your Raspberry Pi From Anywhere: SSH Over The Internet
Table of Contents:
- Introduction: Unlocking Remote Control
- Why SSH for Your Raspberry Pi?
- Enabling SSH on Your Raspberry Pi
- SSH on Your Local Network: The First Step
- Connecting Your Raspberry Pi to the Internet: The Challenge
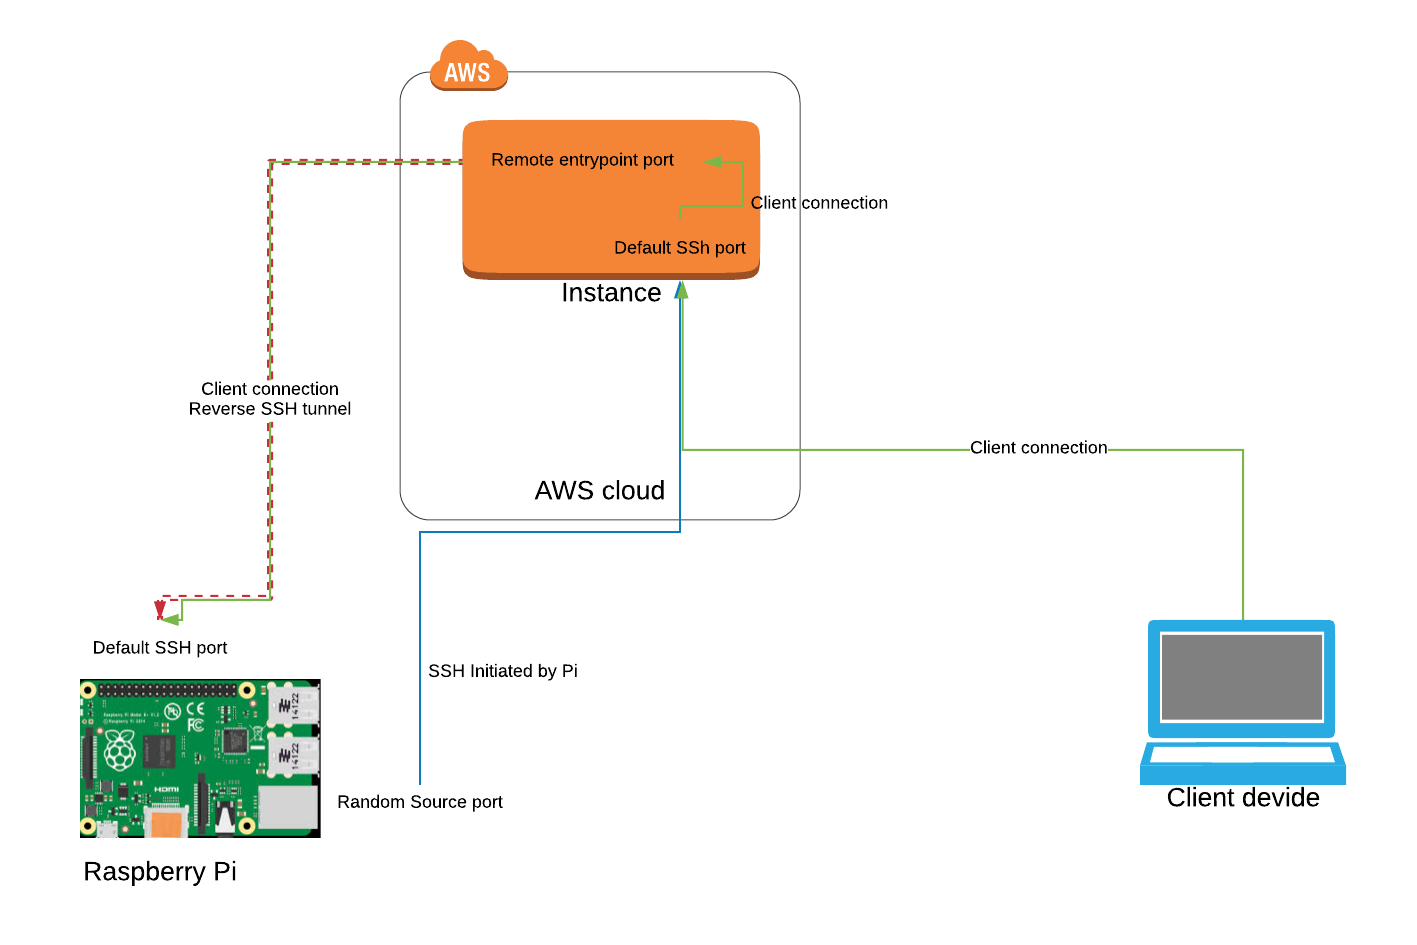
- Securely Accessing Your Raspberry Pi Over the Internet
- Enhancing Security with SSH Keys
- Essential Security Best Practices for SSH
- Common SSH Connection Issues & Troubleshooting
- Conclusion: Your Pi, Remotely Managed
Introduction: Unlocking Remote Control
Imagine having the power to manage your Raspberry Pi from anywhere in the world, whether you're across the room or across the globe. This isn't just a tech fantasy; it's a practical reality thanks to Secure Shell (SSH). For many Raspberry Pi enthusiasts, once the initial setup is done, the monitor and keyboard often become redundant. That's where SSH steps in, transforming your tiny computer into a truly headless, remotely controllable powerhouse.
Remotely accessing your Raspberry Pi via SSH provides a convenient and powerful way to manage your Raspberry Pi from anywhere in the world. Whether you're performing maintenance tasks like upgrades and reboots, transferring files, or running complex commands, SSH offers a secure and efficient command-line interface. In this comprehensive guide, we will walk you through the complete process for securely accessing your Raspberry Pi remotely over the internet, ensuring your projects remain accessible and safe.
Why SSH for Your Raspberry Pi?
SSH, or Secure Shell, is a cryptographic network protocol that allows for secure data communication, remote command-line login, and other secure network services between two networked computers. For your Raspberry Pi, SSH is invaluable. It’s ideal for lightweight distro installations that don’t have graphical interfaces, like Raspberry Pi OS Lite, making it the go-to method for headless operation. Instead of plugging in a monitor, keyboard, and mouse every time you need to interact with your Pi, you can simply open a terminal on another computer and SSH in. This makes development, deployment, and management incredibly flexible. It is a secure remote access protocol, designed to protect your data from eavesdropping and tampering. SSH is handy if you want to quickly connect to a Raspberry Pi from a terminal window on another computer.
Enabling SSH on Your Raspberry Pi
Before you can even think about connecting to your Raspberry Pi from the internet, you need to ensure SSH is enabled on the device itself. By default, Raspberry Pi OS disables SSH for security reasons. Here are the main ways to enable SSH on your Raspberry Pi:
Raspberry Pi OS Lite (Headless Setup)
If you're setting up your Raspberry Pi in headless mode (without a monitor, keyboard, or mouse), this is often the easiest method during the initial SD card preparation. The first step in setting up Raspberry Pi in headless mode is preparing the microSD card.
- Stree2 Movie Download Filmyzillacom
- Amber Ajami Leaked
- Indian Mms Hd
- Willa Fitzgerald Nude
- Indian Hidden Mms
- When Flashing the SD Card: Use a tool like Raspberry Pi Imager. Before writing the OS to the SD card, look for "Advanced Options" (often accessible by pressing Ctrl+Shift+X or a gear icon). Here, you can enable SSH, set a username and password, and even configure Wi-Fi credentials. This applies advanced options when flashing the SD card, making your Pi ready for SSH access from the first boot.
- Manual Method (After Flashing, Before First Boot): After flashing Raspberry Pi OS Lite onto your SD card, but before inserting it into the Pi, mount the boot partition on your computer. Create an empty file named
ssh(no extension) in the root directory of the boot partition. This simple act tells the Raspberry Pi to enable the SSH server on its first boot.
Raspberry Pi OS with Desktop (GUI)
If you have a monitor and keyboard connected to your Raspberry Pi, enabling SSH is straightforward:
- Go to the Raspberry Pi menu (top-left icon).
- Navigate to
Preferences>Raspberry Pi Configuration. - Click on the
Interfacestab. - Find the
SSHoption and selectEnabled. - Click
OK.
Using raspi-config (Terminal Method)
This method works for both Lite and Desktop versions if you have terminal access:
- Open a terminal window on your Raspberry Pi.
- Type
sudo raspi-configand press Enter. - Navigate to
Interface Options. - Select
SSH. - Choose
Yesto enable the SSH server. - Exit
raspi-configand reboot your Pi if prompted.
Once you have enabled SSH on your Raspberry Pi, you can now SSH into it from another computer on the same local network. The steps below will help you configure your Raspberry Pi so it can be accessed remotely through SSH.
SSH on Your Local Network: The First Step
Before attempting to access your Raspberry Pi from the internet, ensure you can connect to it on your local network. This confirms SSH is properly enabled and your network configuration is correct. Yes, you can use SSH on your Raspberry Pi without an internet connection by connecting both devices on a local network.


Detail Author:
- Name : Luciano Davis
- Username : benjamin82
- Email : emard.harmon@runte.net
- Birthdate : 1976-01-08
- Address : 481 Boyer Points Suite 669 West Herminio, TX 92891
- Phone : 815-859-5165
- Company : Sanford-Olson
- Job : Soil Conservationist
- Bio : Architecto incidunt magnam sit nisi et ut consequatur. Sit molestiae qui est nihil.
Socials
twitter:
- url : https://twitter.com/clementinelang
- username : clementinelang
- bio : Et quia dolores omnis soluta omnis aut. Atque ea officia hic minima. Veniam id aperiam quisquam dolore. Et quod dolor quisquam id occaecati itaque.
- followers : 4520
- following : 2292
linkedin:
- url : https://linkedin.com/in/clementine_lang
- username : clementine_lang
- bio : Aut at laborum enim qui commodi facere.
- followers : 3830
- following : 862
facebook:
- url : https://facebook.com/lang2011
- username : lang2011
- bio : Architecto qui voluptatem enim quo et aut.
- followers : 5802
- following : 2060
instagram:
- url : https://instagram.com/clementine.lang
- username : clementine.lang
- bio : Eius quibusdam et est dicta ex. Dicta voluptas qui magni harum quia itaque vitae.
- followers : 2535
- following : 148
tiktok:
- url : https://tiktok.com/@clementine.lang
- username : clementine.lang
- bio : Magni blanditiis et et aperiam atque consectetur voluptates.
- followers : 4900
- following : 854
