Unlock Secure IoT: Raspberry Pi & AWS VPC Connectivity
In today's interconnected world, the Internet of Things (IoT) is transforming industries and daily life. As more devices come online, ensuring secure communication between IoT devices and the cloud is critical for protecting sensitive data and maintaining operational integrity. This article will guide you through the process of how to securely connect remote IoT VPC on AWS with Raspberry Pi devices, offering a robust and reliable solution for your remote IoT deployments.
Connecting your Raspberry Pi to an AWS server via a Virtual Private Cloud (VPC) is a powerful method for remote IoT device management. It provides the advantage of securely isolating your devices and data within your own private network space on AWS. Are you ready to dive into the world of securely connecting your remote IoT devices through AWS VPC using a trusty Raspberry Pi? This is not just another tech article—it’s your comprehensive guide to building a resilient and secure IoT infrastructure.
Table of Contents
- Why Secure IoT Connectivity is Paramount
- Understanding AWS Virtual Private Cloud (VPC)
- The Power of Raspberry Pi in Remote IoT
- Remote IoT VPC SSH: The Secure Connection Paradigm
- Step-by-Step: Setting Up Your Secure Connection
- Implementing Robust Security Best Practices
- Troubleshooting Common Connectivity Challenges
- Beyond the Basics: Scaling and Advanced IoT Architectures
- Conclusion: Your Journey to Secure Remote IoT Success
Why Secure IoT Connectivity is Paramount
In an era where everything from smart homes to industrial sensors is connected, the sheer volume of data being transmitted is staggering. This data, often sensitive, requires robust protection. Without adequate security measures, IoT devices can become easy targets for cyberattacks, leading to data breaches, operational disruptions, and significant financial losses. The stakes are incredibly high, especially when dealing with critical infrastructure or personal information. How do you ensure your data remains private and protected?
The answer lies in implementing a secure communication channel. Unsecured IoT devices can act as entry points for malicious actors into your broader network, compromising not just the device itself but potentially your entire system. This risk is amplified when devices are deployed in remote or public locations, making direct physical security impractical. Therefore, building a secure connection from the ground up isn't just an option; it's a critical requirement for anyone aiming to build a robust and safe IoT ecosystem. By prioritizing security, you safeguard your data, maintain operational integrity, and build trust in your IoT solutions. Learning how to set up a secure connection for your IoT devices using AWS ensures that your remote deployments are protected against evolving cyber threats.
Understanding AWS Virtual Private Cloud (VPC)
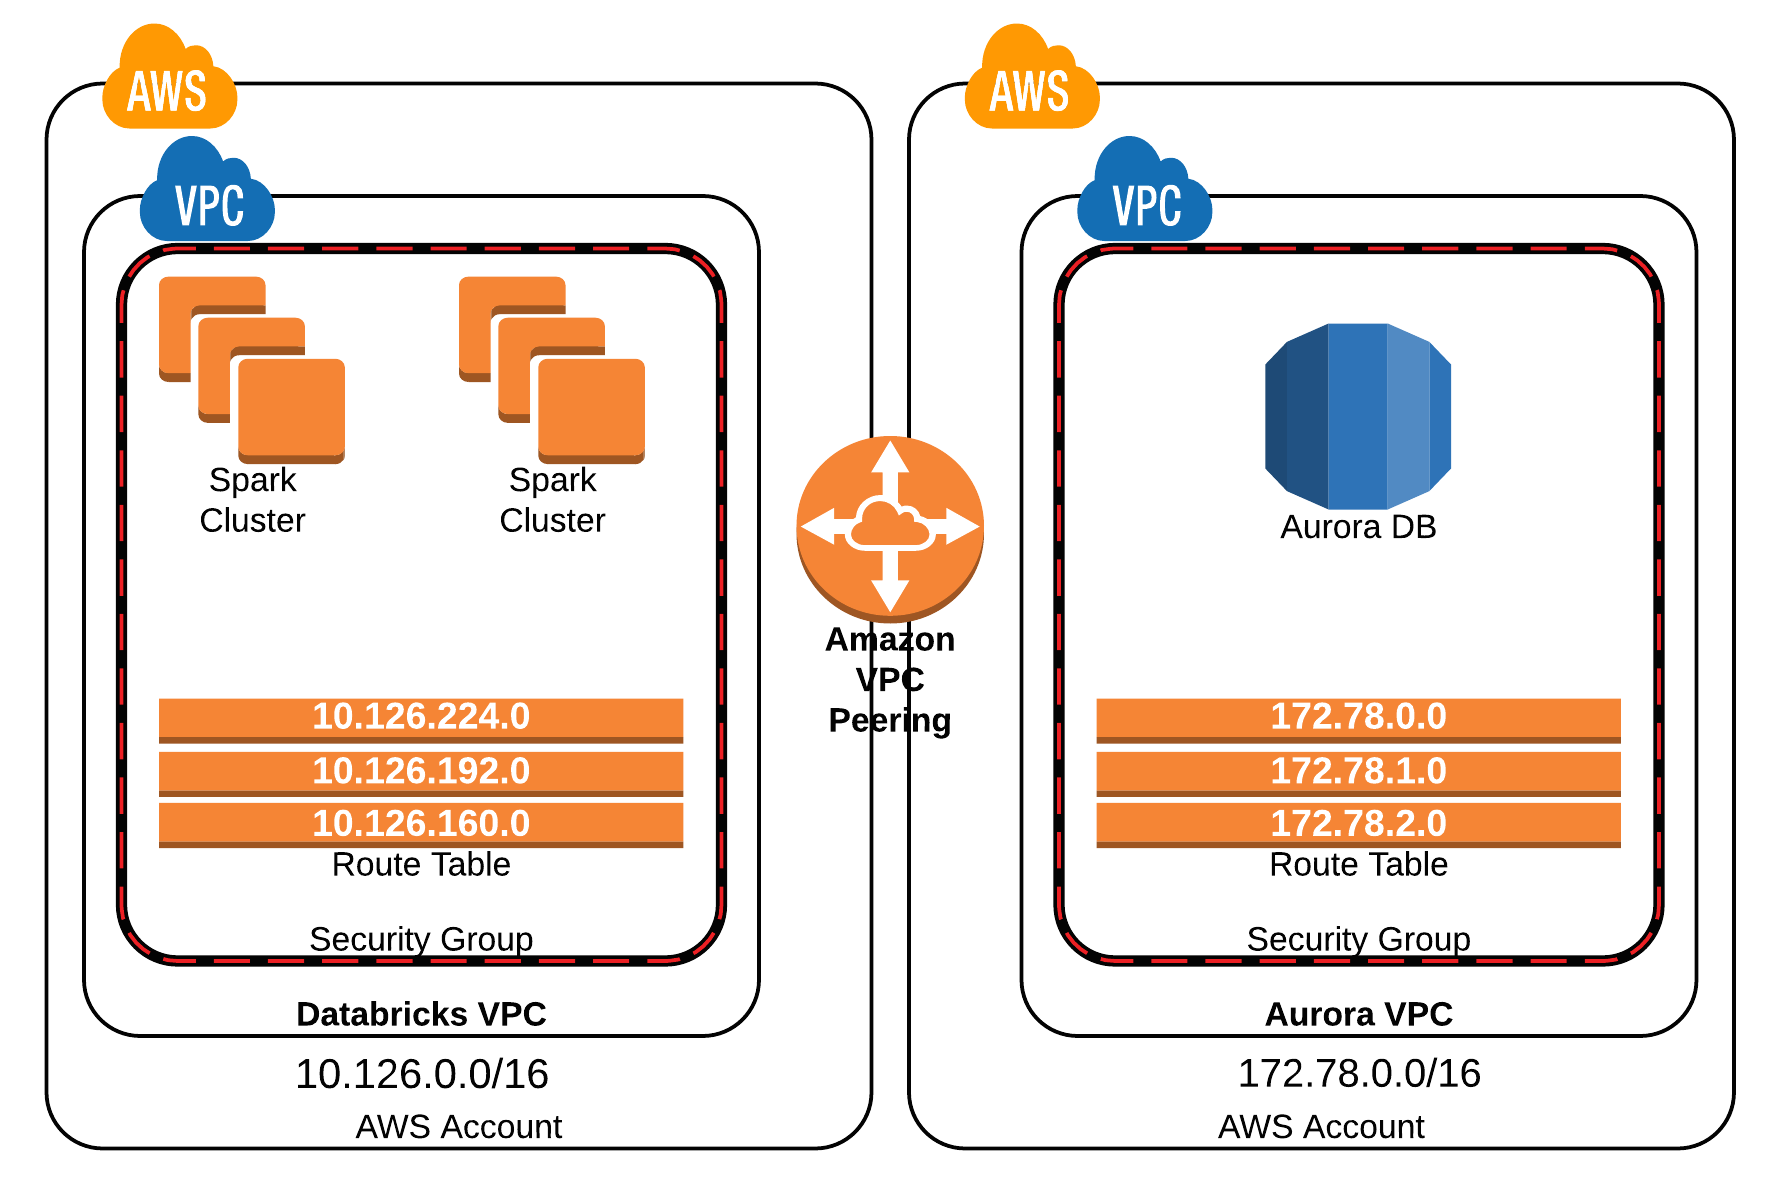
An AWS VPC is essentially your own private, isolated network within the AWS cloud. Think of it as a virtual data center that you have complete control over. Within your VPC, you can launch AWS resources, such as EC2 instances (virtual servers), databases, and, crucially, connect your remote IoT devices. This isolation is a cornerstone of cloud security, providing a dedicated space where your resources can operate without interference from other AWS customers.
The power of AWS VPC lies in its configurability. You define your own IP address range, create subnets, configure route tables, and set up network gateways. This granular control allows you to design a network topology that perfectly suits your security and connectivity needs. For IoT, this means you can create specific subnets for your devices, implement strict firewall rules using security groups and network ACLs, and establish secure tunnels. By leveraging AWS Virtual Private Cloud (VPC), you can ensure robust security and seamless connectivity for your IoT devices, creating a fortress for your data as it travels between your Raspberry Pi and the cloud. This private network environment is fundamental to achieving a truly secure connection for your remote IoT deployments.
The Power of Raspberry Pi in Remote IoT
The Raspberry Pi, a credit-card-sized single-board computer, has revolutionized the world of embedded systems and IoT. Its low cost, versatility, and powerful processing capabilities make it an ideal choice for a wide range of IoT applications, from environmental monitoring to home automation and industrial control. For remote IoT deployments, the Raspberry Pi offers an unparalleled combination of flexibility and performance.
What makes the Raspberry Pi so suitable for remote IoT?
- Compact Size: Its small footprint allows it to be deployed in tight spaces or integrated seamlessly into existing machinery.
- Low Power Consumption: Ideal for battery-powered or off-grid applications where energy efficiency is crucial.
- GPIO Pins: These General Purpose Input/Output pins enable direct interaction with sensors, actuators, and other hardware components, making it a true "edge" device.
- Linux-based OS: Running a variant of Linux (typically Raspberry Pi OS), it provides a familiar and powerful environment for developers, allowing for easy installation of software, scripting, and networking tools.
- Community Support: A massive global community provides extensive documentation, tutorials, and troubleshooting assistance, making development and deployment significantly easier.
Remote IoT VPC SSH: The Secure Connection Paradigm
Securely connecting your Raspberry Pi to an AWS VPC using remote IoT is no longer a complex task. It's a critical requirement for anyone aiming to build a robust and safe IoT infrastructure. Enter the concept of remote IoT VPC SSH on Raspberry Pi with AWS. This method combines the power of SSH for secure remote access, the versatility of Raspberry Pi as a data collection and processing hub, and the robust, private networking capabilities of AWS VPC. This trifecta creates an incredibly secure and efficient channel for managing your remote IoT devices.
The primary goal here is to establish a secure, encrypted tunnel between your Raspberry Pi, located anywhere in the world, and your AWS VPC. This tunnel ensures that all data exchanged between the Pi and your AWS resources remains confidential and protected from eavesdropping or tampering. It's about creating a direct, private line, bypassing the public internet's inherent vulnerabilities as much as possible.
SSH Fundamentals for IoT Security
SSH, or Secure Shell, is a cryptographic network protocol for operating network services securely over an unsecured network. Its most common application is remote command-line login and remote command execution. For IoT, SSH is invaluable because it provides:
- Strong Encryption: All data transmitted over an SSH connection is encrypted, preventing unauthorized access and ensuring data privacy.
- Authentication: SSH uses robust authentication methods, primarily public-key cryptography, to verify the identity of both the client (your local machine or another server) and the server (your Raspberry Pi). This prevents unauthorized users from gaining access.
- Data Integrity: SSH ensures that the data transferred remains unaltered during transit, protecting against tampering.
When you connect your Raspberry Pi to an AWS VPC using SSH, you're essentially creating a highly secure conduit for management, data transfer, and even setting up reverse tunnels for specific applications. This is a fundamental building block for any secure remote IoT deployment.
Why SSH is Ideal for Raspberry Pi IoT Management
SSH is particularly well-suited for managing Raspberry Pi devices in remote IoT environments for several reasons:
- Remote Administration: You can execute commands, install software, update the operating system, and troubleshoot issues on your Raspberry Pi from anywhere in the world, as long as it has an internet connection and can reach your AWS VPC.
- Secure File Transfer: Tools like `scp` (Secure Copy Protocol) and `sftp` (SSH File Transfer Protocol) built on SSH allow for secure transfer of files between your local machine and the Raspberry Pi, crucial for deploying new code or retrieving logged data.
- Port Forwarding/Tunneling: SSH can create secure tunnels for other services, allowing you to access web interfaces or other applications running on your Raspberry Pi securely, even if they are not directly exposed to the internet.
- Low Overhead: SSH is relatively lightweight, making it suitable for resource-constrained devices like the Raspberry Pi.
Are you ready to build a robust and secure connection between your Raspberry Pi, located in a remote IoT environment, and your AWS server residing within a Virtual Private Cloud? This approach allows for unparalleled control and security for your IoT fleet.
Step-by-Step: Setting Up Your Secure Connection
This guide provides a comprehensive solution to securely connect remote IoT devices, specifically a Raspberry Pi, to an AWS VPC. By the end of this article, you will have a comprehensive understanding of securely connecting remote IoT VPC using Raspberry Pi on AWS. Set up a secure remote IoT VPC network with Raspberry Pi on AWS. This guide covers setup, security, & troubleshooting for your IoT projects.
Prerequisites for a Seamless Setup
Before we dive into the configurations, ensure you have the following:
- A Raspberry Pi: Any model with network connectivity (Wi-Fi or Ethernet) will work. Ensure it's running the latest Raspberry Pi OS.
- AWS Account: An active AWS account with necessary permissions to create VPCs, EC2 instances, and security groups.
- Basic Linux Command Line Knowledge: Familiarity with navigating directories, executing commands, and editing files in a Linux environment.
- SSH Client: For your local machine (e.g., PuTTY for Windows, OpenSSH built-in for macOS/Linux).
- Internet Connectivity: For both your Raspberry Pi and your local machine.
Configuring Your Raspberry Pi for AWS Connectivity
First, configure the Raspberry Pi with the necessary software, such as the VPN client or the AWS IoT SDK. For a direct SSH connection into a VPC, we'll focus on ensuring SSH is enabled and potentially installing a VPN client if you choose a VPN-based tunnel (though direct SSH via a bastion host is often simpler for initial setup).
- Install Raspberry Pi OS: Flash the latest Raspberry Pi OS (formerly Raspbian) onto an SD card. Use Raspberry Pi Imager for this. Enable SSH during the imaging process or by creating an empty file named `ssh` in the boot partition after flashing.
- Initial SSH Access: Connect your Raspberry Pi to your local network. Find its IP address (e.g., using `nmap` or checking your router's connected devices). SSH into it from your local machine: `ssh pi@<Raspberry_Pi_IP>`. The default password is `raspberry`. Change this immediately using `passwd`.
- Update and Upgrade: Keep your Pi's software up-to-date for security and stability:
sudo apt update sudo apt upgrade -y - Install Necessary Tools (Optional, for VPN): If you plan to use OpenVPN or another VPN client for a more persistent tunnel, install it now. However, for a simple SSH tunnel via a bastion host, this step isn't strictly necessary for the Pi itself.
Setting Up Your AWS VPC for IoT Devices
Second, configure the AWS VPC, creating the necessary security. This involves several key steps to create your private network and a secure entry point.
- Create a New VPC:
- Go to the AWS Management Console, navigate to VPC.
- Click "Create VPC".
- Choose "VPC and more" for a quick setup. Define a CIDR block (e.g., `10.0.0.0/16`).
- This will automatically create a VPC, subnets (public and private), an Internet Gateway (IGW), and a NAT Gateway (NAT GW). The IGW allows internet access to your public subnet, and the NAT GW allows instances in your private subnet to initiate outbound connections to the internet.
- Launch a Bastion Host (EC2 Instance) in the Public Subnet:
- A bastion host is a server that sits in your public subnet and acts as a jump server to your private network. You will SSH into this instance first, and then from there, SSH into your Raspberry Pi (once it's connected to the VPC).
- Go to EC2, launch a new instance. Choose an Amazon Linux 2 AMI (it's lightweight and secure).
- Select an instance type (e.g., `t2.micro` or `t3.nano` for cost-effectiveness).
- In "Network settings," select your newly created VPC and choose a public subnet. Enable "Auto-assign public IP."
- Create a new key pair (e.g., `iot-bastion-key.pem`) and download it. Keep this file secure!
- Configure a security group for the bastion host: Allow SSH (port 22) from your specific public IP address (or a very restricted range) to minimize exposure.
- Launch the instance.
- Configure Security Groups for the Private Subnet (for Raspberry Pi):
- Go to VPC > Security Groups. Create a new security group (e.g., `raspberry-pi-sg`).
- Add an inbound rule: Allow SSH (port 22) from the security group of your bastion host. This means only your bastion host can initiate SSH connections to your Raspberry Pi. This is a crucial security measure.
- Add outbound rules as needed (e.g., allow all outbound traffic to the internet via the NAT Gateway, or restrict it to specific services).
- Connect Raspberry Pi to the VPC (using OpenVPN or similar):
This is the critical step to bring your remote Raspberry Pi into your AWS VPC's private network. While there are several ways (AWS IoT Core, Site-to-Site VPN, Direct Connect), for a single or small fleet of remote Pis, an OpenVPN client on the Pi connecting to an OpenVPN server (running on an EC2 instance in your VPC) is a common and flexible solution.
- Launch an OpenVPN Server EC2 Instance:
- Launch another EC2 instance in your private subnet (e.g., `t2.micro`).
- Assign it the `raspberry-pi-sg` security group (or a new one that allows SSH from bastion host and VPN traffic).
- Install and configure an OpenVPN server on this instance. Tools like `OpenVPN Access Server` or `openvpn-install` scripts can simplify this. Ensure it's configured to push routes for your VPC's private subnet to connected clients.
- Generate Client Configuration:
- From your OpenVPN server, generate a client configuration file (`.ovpn`) for your Raspberry Pi. This file contains all the necessary connection details, certificates, and keys.
- Transfer and Configure on Raspberry Pi:
- Securely transfer the `.ovpn` file to your Raspberry Pi (e.g., using `scp` via your bastion host).
- Install OpenVPN client on your Raspberry Pi: `sudo apt install openvpn`.
- Copy the `.ovpn` file to `/etc/openvpn/client.conf` (or a similar location).
- Start the OpenVPN client: `sudo systemctl start openvpn@client`.
- Enable it to start on boot: `sudo systemctl enable openvpn@client`.
- Verify Connection:
- Once connected, your Raspberry Pi will receive an IP address from your VPC's private subnet.
- From your bastion host, you should now be able to SSH into your Raspberry Pi using its private IP address.
- `ssh -i /path/to/your/bastion-key.pem ec2-user@<Bastion_Public_IP>`
- Once on the bastion host: `ssh pi@<Raspberry_Pi_Private_IP>`
- Launch an OpenVPN Server EC2 Instance:
Implementing Robust Security Best Practices
Setting up the connection is just the first step. Maintaining a secure remote IoT VPC with Raspberry Pi on AWS requires ongoing vigilance and adherence to best practices:
- Least Privilege Principle: Grant only the necessary permissions to users and services. For your Raspberry Pi, ensure the user account `pi` has only the privileges it needs, and consider creating dedicated users for specific tasks.
- Key-Based Authentication: Always use SSH key pairs instead of passwords for authentication. Disable password-based SSH login on both your bastion host and Raspberry Pi. This significantly reduces the risk of brute-force attacks.
- Regular Updates: Keep your Raspberry Pi OS, OpenVPN client, and all other software up-to-date. Software vulnerabilities are frequently discovered and patched.
sudo apt update && sudo apt upgrade -y sudo rpi-update (for firmware) - Strong Security Group Rules: Continuously review and refine your AWS security group rules. Restrict inbound traffic to the absolute minimum required. For instance, only allow SSH from your trusted IP addresses to the bastion host, and only from the bastion host to your Raspberry Pi.
- Network ACLs: Use Network Access Control Lists (NACLs) in your VPC for an additional layer of stateless packet filtering, acting as a firewall for subnets.
- Monitoring and Logging: Enable CloudWatch logs for your EC2 instances and monitor SSH login attempts. Set up alerts for suspicious activity. Consider using AWS CloudTrail to log API calls.
- Disable Unused Services: On your Raspberry Pi, disable any services or ports that are not actively used (e.g., VNC, FTP if not needed).
- Physical Security: If your Raspberry Pi is in a physically accessible remote location, consider physical security measures to prevent tampering or theft.
- Backup and Recovery: Regularly back up your Raspberry Pi's SD card image and any critical data.
Troubleshooting Common Connectivity Challenges
Even with careful setup, you might encounter issues. Here are some common problems and their solutions:
- Cannot SSH to Bastion Host:
- Security Group: Ensure your bastion host's security group allows inbound SSH (port 22) from your public IP address.
- Key Pair Permissions: On Linux/macOS, ensure your `.pem` file has correct permissions: `chmod 400 /path/to/your/key.pem`.
- Public IP: Verify you're using the correct public IP address of the bastion host.
- Instance State: Check if the EC2 instance is running.
- Cannot SSH from Bastion Host to Raspberry Pi:
- OpenVPN Connection: Verify the OpenVPN client on the Raspberry Pi is running and successfully connected to the OpenVPN server in your VPC. Check `sudo systemctl status openvpn@client`.
- Raspberry Pi IP: Confirm the Raspberry Pi has received a private IP address from your VPC's subnet. Use `ifconfig` or `ip addr show` on the Pi.
- Security Group (Pi): Ensure the Raspberry Pi's security group allows inbound SSH (port 22) from the private IP address of your bastion host (or its security group).
- SSH Server on Pi: Make sure the SSH server is running on the Raspberry Pi: `sudo systemctl status ssh`.
- Firewall on Pi: If you have a firewall like `ufw` enabled on the Pi, ensure it allows SSH.
- No Internet Access from Raspberry Pi (after VPN):
- NAT Gateway: Ensure your private subnet's route table has a route to the NAT Gateway for outbound internet access.
- OpenVPN Server Configuration: Verify the OpenVPN server is correctly configured to route internet traffic through the NAT Gateway.
- Intermittent Connectivity:
- Network Stability: Check the internet connection stability at the Raspberry Pi's remote location.
- Resource Constraints: If the Raspberry Pi is under heavy load, it might struggle with network operations. Monitor CPU/memory usage.
- VPN Server Load: If multiple devices connect to one VPN server, it might become a bottleneck.
Beyond the Basics: Scaling and Advanced IoT Architectures
Once you've mastered securely connecting a single Raspberry Pi, you might consider scaling your IoT deployment. Here are some advanced concepts:
- AWS IoT Core: For managing large fleets of devices, AWS IoT Core provides device management, message brokering, and security features at scale. You can integrate your Raspberry Pi with IoT Core for device shadows, rules engines, and more, all while leveraging your secure VPC connection.
- Fleet Provisioning: Automate the process of onboarding new Raspberry Pi devices into your AWS IoT Core and VPC setup.
- PrivateLink: For highly sensitive applications, AWS PrivateLink allows you to connect your VPC to AWS services (like IoT Core) privately, without traversing the public internet.
- Site-to-Site VPN or AWS Direct Connect: For enterprise-grade connectivity between your on-premises network (where some IoT devices might reside) and your AWS VPC, these services offer dedicated, secure connections.
- Containerization (Docker/Kubernetes): Deploy your IoT applications on Raspberry Pi using Docker containers. This provides consistency, portability, and easier management, especially when combined with services like AWS IoT Greengrass for edge computing.
- Centralized Logging and Monitoring: Utilize AWS CloudWatch, CloudTrail, and other logging services to collect and analyze logs from your Raspberry Pi devices and AWS infrastructure, providing deep insights into performance and security.
By leveraging AWS Virtual Private Cloud (VPC), you can ensure robust security and seamless connectivity for your IoT devices, taking your IoT projects to the next level.
Conclusion: Your Journey to Secure Remote IoT Success
This ultimate guide has covered the essential steps for securely connecting remote IoT devices to AWS VPC using Raspberry Pi. From setting up Raspberry Pi to implementing robust security measures and troubleshooting common issues, you are now equipped with the knowledge to deploy your Raspberry Pi in the cloud, configure SSH securely, and manage your IoT devices effectively. Securely connecting your Raspberry Pi to an AWS VPC using remote IoT is not just a technical exercise; it's a strategic move towards building a resilient, private, and powerful IoT infrastructure.
By the end of this article, you will have a comprehensive understanding of securely connecting remote IoT VPC using Raspberry Pi on AWS. The principles of security, isolation, and remote management discussed here are fundamental to any successful IoT deployment. We've shown how to leverage the power of the Raspberry Pi and the robust capabilities of AWS VPC to create a secure, private network for your IoT devices. This is not just about connecting devices; it's about safeguarding your data, ensuring operational continuity, and unlocking the full potential of your remote IoT projects.
What are your thoughts on securing remote IoT devices? Have you tried connecting your Raspberry Pi to AWS VPC? Share your experiences and challenges in the comments below! If you found this guide helpful, please consider sharing it with your network, and explore our other articles on cloud computing and IoT security to further enhance your knowledge.


Detail Author:
- Name : Marcelle Walker
- Username : tbergstrom
- Email : ypowlowski@yahoo.com
- Birthdate : 1975-09-13
- Address : 98892 Rippin Locks Suite 224 Xavierberg, NH 43847-5557
- Phone : +1-680-504-2003
- Company : Lebsack, Kohler and Schiller
- Job : Farm and Home Management Advisor
- Bio : Occaecati aut sit velit repellendus voluptatem sed consequuntur. Ad adipisci ex aut. Id molestiae commodi ut possimus sunt.
Socials
linkedin:
- url : https://linkedin.com/in/gudrun_official
- username : gudrun_official
- bio : Natus fugit et fugit consequatur deserunt.
- followers : 6669
- following : 2219
twitter:
- url : https://twitter.com/gudrun4683
- username : gudrun4683
- bio : Molestiae sit sit aliquid voluptates dolores aut. Sit et saepe est similique reiciendis odit. Dolores fuga et et maxime nemo rem.
- followers : 443
- following : 162
instagram:
- url : https://instagram.com/gudrun_effertz
- username : gudrun_effertz
- bio : Et ut quis consequatur cumque nesciunt qui voluptatem. Tenetur mollitia quam quaerat officia.
- followers : 4716
- following : 2071

 is transforming industries and daily life. As more devices come online, ensuring secure commun)