Secure Remote IoT On Windows 10: VPC & SSH Mastery
In today's digital age, remote connectivity has become an essential part of both personal and professional workflows. As the demand for remote connectivity grows, understanding how to configure and manage secure shell (SSH) connections within a virtual private cloud (VPC) environment is paramount. This article is your ultimate guide to mastering remote IoT VPC SSH on Windows 10, ensuring secure and efficient management of your Internet of Things (IoT) devices from anywhere.
Whether you're a hobbyist managing smart home devices or a professional overseeing a fleet of industrial sensors, securely accessing your IoT infrastructure is non-negotiable. Remote IoT VPC SSH on Windows 10 is a powerful solution that enables users to securely manage IoT devices through a Virtual Private Cloud (VPC) environment. Think of it as a digital bridge that lets you connect to your devices with robust security, eliminating the need for direct exposure to the public internet. This guide will delve into the best practices for setting up a remote IoT system using VPC, SSH, and your Windows 10 machine, breaking it down step by step so you can confidently set up and manage your remote IoT VPC SSH connection. By the time you’re done reading, you’ll have all the tools, tips, and insights to achieve seamless, secure remote access.
Table of Contents
- Understanding Remote IoT, VPC, and SSH
- Why Remote IoT VPC SSH on Windows 10 is Essential
- Prerequisites for Your Secure Setup
- Step-by-Step Guide: Setting Up Remote IoT VPC SSH on Windows 10
- Best Practices for Enhanced Security and Management
- Common Challenges and Troubleshooting Tips
- Real-World Applications and Future Prospects
- Mastering Remote IoT VPC SSH: Your Gateway to Secure Connectivity
Understanding Remote IoT, VPC, and SSH
Before we dive into the practical steps of setting up remote IoT VPC SSH on Windows 10, it’s crucial to understand the foundational components. This clarity will empower you to make informed decisions and troubleshoot effectively.
What is Remote IoT?
Remote IoT refers to the ability to manage, monitor, and interact with Internet of Things devices from a location physically distant from the devices themselves. This could be anything from checking the temperature in your smart home while you're on vacation to updating firmware on industrial sensors deployed across different continents. The core idea is to extend your control beyond direct physical access, enabling flexibility and scalability for your IoT deployments. This setup is particularly useful for managing IoT devices in a distributed environment, where physical presence is impractical or impossible.
The Power of Virtual Private Clouds (VPCs)
A Virtual Private Cloud (VPC) is a private, isolated section of a public cloud where you can launch resources in a virtual network that you define. Imagine a large apartment building (the public cloud); a VPC is like your private apartment within that building. You have full control over your virtual networking environment, including IP address ranges, subnets, route tables, and network gateways. Using a VPC with remote IoT significantly enhances security by isolating your devices and data from the public internet, requiring controlled access through mechanisms like SSH. This isolation acts as a crucial barrier, preventing unauthorized access and reducing the attack surface for your sensitive IoT infrastructure. Major cloud providers like AWS, Azure, and Google Cloud all offer robust VPC services, providing the backbone for secure remote connectivity.
Secure Shell (SSH) Explained
Secure Shell (SSH) is a cryptographic network protocol for operating network services securely over an unsecured network. It provides a secure channel over an unsecured network by using a client-server architecture, connecting an SSH client with an SSH server. For our purposes, SSH will be the secure tunnel through which your Windows 10 machine communicates with your IoT devices within the VPC. It encrypts all traffic, including passwords, commands, and data, protecting it from eavesdropping, connection hijacking, and other attacks. Remote IoT VPC SSH is all about connecting to your IoT devices securely through a virtual private cloud using SSH. It’s like creating a private, encrypted tunnel between your control center (Windows 10) and your remote devices.
Why Remote IoT VPC SSH on Windows 10 is Essential
The convergence of remote IoT, VPCs, and SSH on a Windows 10 platform offers a compelling solution for modern connectivity challenges. Here’s why this setup is not just beneficial but often essential:
- Enhanced Security: As mentioned, integrating VPC with SSH on Windows 10 allows you to create a secure tunnel for remote access. This setup isolates your IoT devices from direct exposure to the internet, drastically reducing the risk of cyber threats. All communication is encrypted, safeguarding sensitive data and control commands.
- Flexibility and Accessibility: Whether you're a hobbyist or a professional, mastering remote IoT VPC SSH without extra hassle can save you tons of time and energy. You can manage devices from anywhere in the world, as long as you have an internet connection and your Windows 10 machine. This flexibility is invaluable for geographically dispersed deployments or for individuals who need to monitor their systems on the go.
- Cost-Effectiveness: By enabling remote management, you reduce the need for physical site visits, which can be costly and time-consuming. Troubleshooting, updates, and data collection can all be performed remotely, optimizing operational expenses.
- Scalability: VPCs are inherently scalable, allowing you to easily add or remove IoT devices and expand your network as your needs evolve without significant architectural changes. This makes the remote IoT VPC SSH approach future-proof.
- Reliability: By routing traffic through a controlled VPC environment, you can often achieve more stable and reliable connections compared to direct internet exposure, which can be prone to various network instabilities and public routing issues.
Remote IoT VPC SSH on Windows 10 is essentially a method to securely access and control Internet of Things (IoT) devices from a remote location using Secure Shell (SSH). This method eliminates the need for complex VPN setups or exposing your devices directly to the public internet, offering a streamlined and robust solution.
Prerequisites for Your Secure Setup
Before embarking on the setup process, ensure you have the following components and knowledge in place. We will cover everything from installing necessary software to basic network understanding.
- A Windows 10 Machine: This will be your control center. Ensure it's updated to the latest version for optimal performance and security. Windows 10 now includes a built-in OpenSSH client, simplifying the process.
- An IoT Device: This guide will focus on setting up remote IoT VPC SSH for your Raspberry Pi, enabling secure remote access. However, the principles apply to any Linux-based IoT device (e.g., ESP32 running a Linux distribution, BeagleBone Black, etc.) that supports SSH. Ensure your IoT device is powered on and connected to a network.
- Cloud Provider Account: You'll need an account with a major cloud provider that offers VPC services (e.g., AWS, Azure, Google Cloud Platform). This guide will use general concepts applicable to most providers.
- Basic Networking Knowledge: Familiarity with IP addresses, subnets, firewalls, and network routing will be beneficial.
- Administrator Access: You'll need administrator privileges on your Windows 10 machine and root/sudo access on your IoT device.
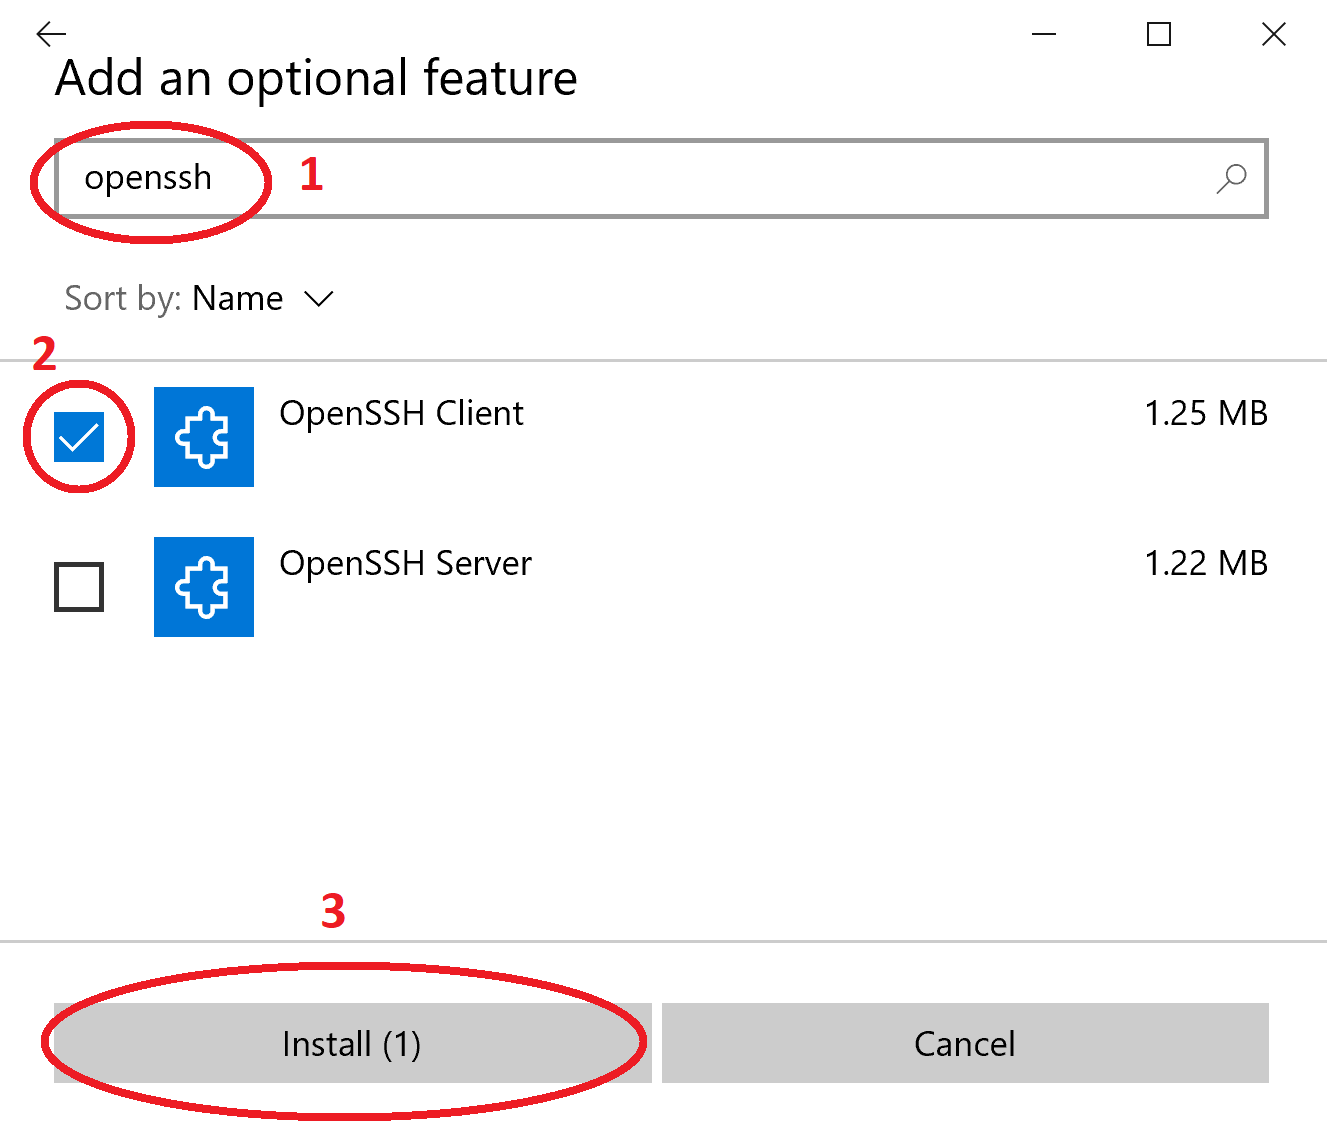
- SSH Client on Windows 10: As mentioned, Windows 10 has a built-in OpenSSH client. You can verify its installation by opening PowerShell or Command Prompt and typing `ssh`. If it’s not found, you can add it via "Optional features" in Windows Settings.
Having these prerequisites ready will ensure a smooth and efficient setup process, allowing you to master remote IoT VPC SSH without unnecessary complications.
Step-by-Step Guide: Setting Up Remote IoT VPC SSH on Windows 10
This section is your golden ticket to understanding how to set up and manage remote IoT devices through VPC SSH connections on Windows 10. We'll break it down step by step, focusing on practical implementation.
Configuring Your VPC Environment
The first crucial step is to set up your Virtual Private Cloud. While the exact steps vary slightly between cloud providers (AWS, Azure, GCP), the core concepts remain consistent.
- Create a VPC: Log in to your cloud provider's console and navigate to the VPC service. Create a new VPC, defining a private IP address range (e.g., 10.0.0.0/16). This range will be unique to your private network.
- Create Subnets: Within your VPC, create at least two subnets:
- Public Subnet: This subnet will host resources that need internet access (e.g., a bastion host or NAT Gateway for outbound traffic).
- Private Subnet: This is where your IoT devices will reside. They will not have direct internet access, enhancing security.
- Internet Gateway (IGW) and Route Tables:
- Attach an Internet Gateway to your VPC. This allows communication between your VPC and the internet.
- Create a route table for your public subnet, directing internet-bound traffic through the IGW.
- For your private subnet, ensure its route table does NOT have a direct route to the IGW. Instead, if your IoT devices need to initiate outbound connections (e.g., for updates), configure a NAT Gateway in the public subnet and route private subnet traffic through it.
- Security Groups/Network ACLs: These act as virtual firewalls.
- Create a security group for your IoT devices. Initially, allow inbound SSH (port 22) traffic ONLY from your bastion host's IP address (which we'll set up next) or a specific IP range you control.
- Create a security group for your bastion host, allowing inbound SSH (port 22) from your Windows 10 machine's public IP address.
- Launch a Bastion Host (Jump Server): This is a critical security component. Launch a small Linux virtual machine (e.g., Ubuntu, Amazon Linux) in your public subnet. This server will be your secure jumping-off point into your private VPC. You will SSH into this bastion host from your Windows 10 machine, and then from the bastion host, you will SSH into your IoT devices in the private subnet.
This comprehensive VPC setup ensures that your IoT devices are isolated and only accessible through a tightly controlled gateway.
Setting Up SSH on Your IoT Device (e.g., Raspberry Pi)
Now, let's prepare your IoT device for SSH access. We will focus on a Raspberry Pi, but the steps are similar for other Linux-based devices.
- Enable SSH:
- For Raspberry Pi OS (formerly Raspbian), SSH is often disabled by default for security. You can enable it via `sudo raspi-config` -> Interfacing Options -> SSH.
- Alternatively, you can create an empty file named `ssh` (no extension) in the boot partition of your SD card before booting the Pi.
- Update and Upgrade: Once logged into your Pi (via direct connection or initial local SSH), run:
This ensures all packages, including OpenSSH server, are up to date.sudo apt update sudo apt upgrade -y - Generate SSH Key Pair (on the Pi - optional but recommended for server-side): While you'll typically use key-based authentication from your Windows 10 machine, generating a key pair on the Pi itself can be useful for certain advanced scenarios or if you need the Pi to initiate SSH connections.
Press Enter for default location and no passphrase for simplicity in an isolated VPC (though a passphrase is good practice for publicly exposed keys).ssh-keygen -t rsa -b 4096 -C "your_email@example.com" - Configure SSH Server (`sshd_config`): Edit the SSH daemon configuration file:
Consider these changes for enhanced security:sudo nano /etc/ssh/sshd_config- `PermitRootLogin no` (if you have a separate user)
- `PasswordAuthentication no` (after you've set up key-based authentication)
- `Port 22` (default, but you can change it if necessary for specific network configurations, though within a private VPC, 22 is fine).
Your IoT device is now ready to accept SSH connections from authorized sources within your VPC.
Establishing SSH Connection from Windows 10
This is where your Windows 10 machine comes into play. We’ll demystify the process of setting up a secure SSH connection from your Windows 10 machine to your remote IoT VPC, ensuring efficient and secure remote access.
- Generate SSH Key Pair on Windows 10:
- Open PowerShell or Command Prompt.
- Type: `ssh-keygen -t rsa -b 4096 -C "your_email@example.com"`
- Press Enter for the default location (`C:\Users\YourUser\.ssh\id_rsa`) and optionally set a passphrase. This generates two files: `id_rsa` (private key) and `id_rsa.pub` (public key). Keep your private key secure!
- Upload Public Key to Bastion Host:
- Copy the content of `id_rsa.pub` from your Windows machine.
- SSH into your bastion host (you might need to use a temporary password or an initial key provided by your cloud provider).
- On the bastion host, append your public key to the `~/.ssh/authorized_keys` file. If the `.ssh` directory or `authorized_keys` file doesn't exist, create them with appropriate permissions (`chmod 700 ~/.ssh` and `chmod 600 ~/.ssh/authorized_keys`).
- Example: `echo "your_public_key_content_here" >> ~/.ssh/authorized_keys`
- Configure SSH Agent (Optional but Recommended):
- The SSH agent securely stores your private keys in memory, so you don't have to enter your passphrase repeatedly.
- Open PowerShell as Administrator.
- Start the agent: `Get-Service ssh-agent | Set-Service -StartupType Automatic` (to set it to start automatically) and then `Start-Service ssh-agent`.
- Add your private key: `ssh-add C:\Users\YourUser\.ssh\id_rsa` (enter your passphrase if you set one).
- Connect to Bastion Host from Windows 10:
- Open PowerShell or Command Prompt.
- Use the command: `ssh -i C:\Users\YourUser\.ssh\id_rsa username@bastion_host_public_ip` (replace `username` and `bastion_host_public_ip`). If you used `ssh-add`, you might just need `ssh username@bastion_host_public_ip`.
- You should now be securely connected to your bastion host.
- Connect to IoT Device from Bastion Host:
- From your bastion host, you will now connect to your IoT device in the private subnet. You'll need the private IP address of your IoT device (e.g., 10.0.1.10).
- If your IoT device also uses key-based authentication (highly recommended), you'll need to copy your public key (the same `id_rsa.pub` from your Windows machine) to the IoT device's `~/.ssh/authorized_keys` file. You can do this by SCPing the public key from your Windows machine to the bastion host, then from the bastion host to the IoT device, or by directly copying it during the initial setup of the IoT device.
- Once the public key is on the IoT device, from the bastion host, execute: `ssh username@iot_device_private_ip` (e.g., `ssh pi@10.0.1.10`).
- You are now securely connected to your IoT device via your bastion host, all initiated from your Windows 10 machine!
This multi-hop SSH connection provides an excellent layer of security for your remote IoT VPC SSH setup.
Best Practices for Enhanced Security and Management
While the setup above provides a secure foundation, implementing best practices is crucial for maintaining a robust and manageable remote IoT VPC SSH system. In this article, we will explore the best practices for setting up SSH connections to IoT devices within a VPC on Windows 10.
- Always Use Key-Based Authentication: Never rely solely on passwords for SSH access. SSH keys are far more secure. Disable password authentication on your bastion host and IoT devices once key-based access is confirmed.
- Strong Passphrases for Private Keys: Even with key-based authentication, protect your private key with a strong, unique passphrase. This adds another layer of security in case your private key file is compromised.
- Principle of Least Privilege:
- User Accounts: Create separate, non-root/non-administrator user accounts on your IoT devices for daily operations. Only use `sudo` when necessary.
- Security Groups/Network ACLs: Restrict inbound traffic to the absolute minimum required. Only allow SSH (port 22) from specific, trusted IP addresses (your Windows 10 machine's public IP for the bastion, and the bastion's private IP for the IoT devices).
- Regular Updates: Keep your Windows 10 operating system, SSH client, cloud provider tools, and especially your IoT device's operating system and software up to date. Patches often address critical security vulnerabilities.
- Monitor Logs: Regularly review SSH logs on your bastion host and IoT devices for any unusual activity or failed login attempts. Tools like `fail2ban` can automatically ban IPs that show suspicious activity.
- Session Management: For long-running tasks, consider using terminal multiplexers like `tmux` or `screen` on your bastion host or IoT devices. This allows you to detach from a session and reattach later, even if your SSH connection breaks.
- Automate with SSH Config: For frequent connections, configure your Windows 10 SSH client's `config` file (`C:\Users\YourUser\.ssh\config`). This allows you to define aliases and settings for specific hosts, including proxy commands for multi-hop connections.
With this, you can simply type `ssh iot-device` from your Windows 10 machine to connect directly to your IoT device via the bastion host.Host bastion-host HostName your_bastion_public_ip User your_bastion_user IdentityFile ~/.ssh/id_rsa Host iot-device HostName your_iot_private_ip User your_iot_user ProxyJump bastion-host IdentityFile ~/.ssh/id_rsa - Backup SSH Keys: Securely back up your private SSH keys in an encrypted format. Losing your private key means losing access to your devices.
By diligently applying these best practices, you can ensure your remote IoT VPC SSH setup remains secure, efficient, and resilient against potential threats.
Common Challenges and Troubleshooting Tips
Even with a clear guide, you might encounter issues. Here are some common challenges when setting up remote IoT VPC SSH and how to troubleshoot them:
- Connection Timed Out:
- Firewall/Security Group Issues: This is the most common culprit. Double-check your cloud provider's security group rules for both the bastion host (inbound SSH from your Windows 10 IP) and the IoT device (inbound SSH from the bastion host's private IP).
- Network ACLs: Ensure Network ACLs (if used) are not blocking traffic.
- IoT Device Not Running SSH Server: Verify that the SSH server is running on your IoT device (`sudo systemctl status ssh`).
- Incorrect IP Address: Confirm you are using the correct public IP for the bastion host and the correct private IP for the IoT device.
- Permission Denied (Publickey):
- Incorrect Public Key: Ensure the public key on the bastion host's and IoT device's `~/.ssh/authorized_keys` file exactly matches the public key generated on your Windows 10 machine. No extra spaces or line breaks.
- Incorrect Permissions: On Linux (bastion and IoT device), the `.ssh` directory should be `chmod 700` and `authorized_keys` should be `chmod 600`. Incorrect permissions will cause SSH to ignore the file.
- Wrong User: Ensure you are trying to SSH as the correct user (e.g., `ec2-user` for AWS EC2, `pi` for Raspberry Pi).
- Private Key Passphrase: If your private key has a passphrase, ensure you are entering it correctly.
- Host Key Verification Failed:
- This means the host key presented by the server doesn't match what your client expects. This can happen if the server was reinstalled, or if there's a man-in-the-middle attack (less likely in a VPC).


Detail Author:
- Name : Nedra Daugherty DVM
- Username : hamill.gillian
- Email : yazmin.lind@harvey.com
- Birthdate : 1981-07-16
- Address : 110 Devante Cove Apt. 947 North Ethan, CO 16712-7233
- Phone : +1-534-969-9919
- Company : Beer Ltd
- Job : Surgical Technologist
- Bio : Sed adipisci consequatur et temporibus temporibus et quibusdam. Eaque cupiditate alias qui est nostrum quo modi. Nobis sed similique eveniet maxime autem tempora itaque maxime.
Socials
twitter:
- url : https://twitter.com/linnea_id
- username : linnea_id
- bio : Aut aut perspiciatis iure id. Voluptatibus et dolorum non ut. Deleniti nisi quod odio dolores harum exercitationem qui.
- followers : 2769
- following : 701
facebook:
- url : https://facebook.com/linnea_shanahan
- username : linnea_shanahan
- bio : Est consectetur et consectetur praesentium. Repudiandae sed beatae vero.
- followers : 1533
- following : 2318
tiktok:
- url : https://tiktok.com/@linnea6507
- username : linnea6507
- bio : Repudiandae quia qui quo excepturi ut fuga quis ab.
- followers : 2173
- following : 1169
