The Pilot Light On Your Gas Water Heater: Your Guide To Hot Water
Imagine stepping into the shower, anticipating a comforting stream of hot water, only to be met with an icy shock. For many homeowners with gas water heaters, this jarring experience often points to one common culprit: the pilot light. This small, often overlooked flame is the unsung hero of your home's hot water supply, playing a pivotal role in igniting the main burner that heats your water. Understanding its function, recognizing when it's out, and knowing how to safely relight it are essential skills for any homeowner, ensuring your daily routines remain uninterrupted and comfortable. This comprehensive guide will illuminate everything you need to know about your gas water heater's pilot light, from its fundamental purpose to detailed troubleshooting, empowering you to maintain your hot water system with confidence.
The pilot light on your water heater is the little blue flame used to light the gas streaming to your heater from the gas pipes coming from outside your home. It's a continuous, tiny beacon that stands ready to ignite the powerful main burner whenever your thermostat signals a need for hot water. While some people might overlook its importance, a properly functioning pilot light is non-negotiable for a gas water heater to work efficiently. When the water heater pilot light goes out, your hot water supply comes to an abrupt halt. Luckily, relighting a pilot light if it ever goes out is usually relatively easy and should only take a few seconds, provided you follow the correct, safe procedures.
Table of Contents
- Understanding the Heart of Your Hot Water: What is a Pilot Light?
- Signs Your Pilot Light Has Gone Out
- Safety First: Essential Precautions Before Relighting
- Step-by-Step Guide: How to Safely Relight Your Gas Water Heater Pilot Light
- Troubleshooting Common Pilot Light Issues
- When to Call a Professional: Recognizing Serious Problems
- Maintaining Your Gas Water Heater's Pilot Light for Longevity
- Conclusion: Keeping the Flame Alive for Consistent Comfort
Understanding the Heart of Your Hot Water: What is a Pilot Light?
Before learning how to light the pilot on a water heater, it’s important to understand the design and function of a pilot light. A pilot light is a small, continuously burning flame inside your gas water heater. It’s responsible for igniting the burner whenever the thermostat detects that the water temperature has dropped below your set point. Essentially, it acts as a constant, ready-to-go ignition source for the much larger main burner that does the heavy lifting of heating your water. This system is a cornerstone of gas appliance technology, found not only in water heaters but also in furnaces and some older gas stoves.The Crucial Role of the Pilot Light
For a gas water heater to work, it needs a pilot light to ignite the gas and heat your water. Without this small flame, the main gas burner cannot be lit, and consequently, your water will remain cold. This continuous flame ensures that the main burner can be ignited instantly when needed, providing on-demand hot water. Unlike electric water heaters, which use heating elements, gas water heaters rely on combustion, and the pilot light is the critical first step in that process. It's a testament to simple, yet effective, engineering that has been a reliable part of home heating for decades.How a Pilot Light Works with Your Water Heater
The water heater pilot light is a small flame that ignites the gas burner on your water heater. When the thermostat on your water heater senses that the water temperature has fallen below the desired setting, it signals the main gas valve to open. This allows gas to flow to the main burner. The continuously burning pilot light then provides the spark needed to ignite this gas, causing the main burner to fire up and begin heating the water in the tank. An integral component in this system is the thermocouple. This small, copper rod-like device sits directly in the pilot flame. When heated by the pilot light, the thermocouple generates a tiny electrical current, which tells the gas control valve that the pilot light is indeed lit. If the pilot light goes out, the thermocouple cools down, stops generating this current, and signals the gas valve to shut off the gas supply to both the pilot and the main burner. This is a crucial safety feature, preventing unburnt gas from accumulating in your home, which could lead to a dangerous explosion. Therefore, maintaining a steady pilot light is not just about having hot water, but also about ensuring the safe operation of your appliance.Signs Your Pilot Light Has Gone Out
Recognizing the signs of an extinguished pilot light can help address issues quickly and prevent prolonged cold showers. If you live in a home with a gas water heater and notice cold water coming from your hot water faucet, there’s a good chance your pilot light has gone out. This is the most common and undeniable indicator.The Obvious Sign: No Hot Water
A sudden lack of hot water usually points to an inactive burner, indicating the pilot light is out. This is often the first and most alarming sign for homeowners. You might notice the water gradually getting colder, or it might be instantly cold if the pilot light went out recently. Before you panic and assume a major appliance breakdown, checking the pilot light should always be your first troubleshooting step. For homes with gas water heaters, you should check your pilot light to make sure it didn’t go out, especially if you’ve experienced a power outage, a gas supply interruption, or even a strong draft in your utility area.Other Subtle Clues
While no hot water is the most direct sign, there might be other, more subtle clues that your pilot light is struggling or has gone out.- Intermittent Hot Water: If your hot water supply is inconsistent, sometimes hot and sometimes cold, it could indicate a flickering pilot light that occasionally goes out and then reignites (though this is less common for a fully extinguished pilot).
- No Sound of the Burner: When your water heater is working, you can usually hear the main burner ignite and run. If you don't hear this familiar hum or roar when hot water is being called for, it's a strong indication that the pilot light isn't igniting the main burner.
- Gas Smell (Caution!): This is a serious sign. If you smell gas, it could mean the pilot light is out and gas is escaping. If you detect a strong gas odor, do NOT attempt to relight the pilot. Immediately turn off the gas supply to the water heater, open windows and doors, and evacuate your home. Contact your gas company or a qualified professional immediately. This is a critical YMYL (Your Money or Your Life) safety concern.
Safety First: Essential Precautions Before Relighting
Before attempting to relight your gas water heater's pilot light, safety must be your absolute top priority. Working with gas appliances carries inherent risks, and understanding these precautions can prevent accidents, injuries, or property damage. This section adheres strictly to YMYL principles, emphasizing the critical importance of following safety guidelines. 1. **Read Your Water Heater Manual:** Every water heater model is slightly different. Your specific unit’s manual will provide precise instructions and diagrams for locating and relighting the pilot light, as well as any model-specific safety warnings. This is your primary, most reliable source of information. 2. **Ensure No Gas Leak:** The most critical safety check. If you smell gas, do NOT proceed. As mentioned earlier, immediately turn off the gas supply, ventilate your home, and contact your gas provider or a licensed professional. Do not operate any electrical switches or open flames if you suspect a gas leak. 3. **Ventilation:** Ensure the area around the water heater is well-ventilated. Open nearby windows and doors to allow any residual gas to dissipate. 4. **Clear the Area:** Remove any flammable materials, aerosols, or chemicals from the vicinity of the water heater. 5. **Wear Appropriate Attire:** Avoid loose clothing that could catch fire. 6. **Have the Right Tools:** You'll likely need a long lighter or long match. Never use a short match or standard lighter that could put your hand too close to the flame. 7. **Know How to Turn Off Gas:** Familiarize yourself with the location of the main gas shut-off valve for your water heater and, if necessary, the main gas shut-off for your entire home. In an emergency, you need to know how to quickly cut off the gas supply. Turn off the heater mode on your thermostat. Find the valve on your gas line. Turn it to the off position. This position should face away (perpendicular) to your gas pipe. Remember, if at any point you feel uncomfortable or unsure, or if you suspect a more serious underlying issue, stop and call a qualified professional. Your safety is paramount.Step-by-Step Guide: How to Safely Relight Your Gas Water Heater Pilot Light
Relighting a gas water heater pilot light is a common task for homeowners, and with the right approach, it can be done safely and effectively. This guide will walk you through the steps to safely and effectively relight your gas water heater. Before you start, it’s important to understand why the pilot light went out, as persistent issues might require professional intervention.Preparing for Relighting: Gas and Power Safety
Before you even think about lighting a flame, you need to ensure the environment is safe.- Turn Off Gas Supply: Locate the gas control knob on your water heater. It typically has settings like "OFF," "PILOT," and "ON." Turn the knob to the "OFF" position. This will stop the flow of gas to both the pilot and the main burner, allowing any residual gas to clear. Wait at least 5-10 minutes to ensure any unburnt gas has dissipated. This step is crucial for safety.
- Turn Off Power (if applicable): While not always necessary for the pilot light itself, it's good practice to turn off the power to the water heater if it has any electronic components or if you're unsure. This can usually be done at the circuit breaker.
- Locate the Pilot Light Assembly: The pilot light assembly is typically located near the bottom of the water heater, often behind a small removable cover or access panel. Locate the cover for the pilot light. This cover is usually located just below the gas valve. You might need a screwdriver to remove it.
Locating and Accessing the Pilot Assembly
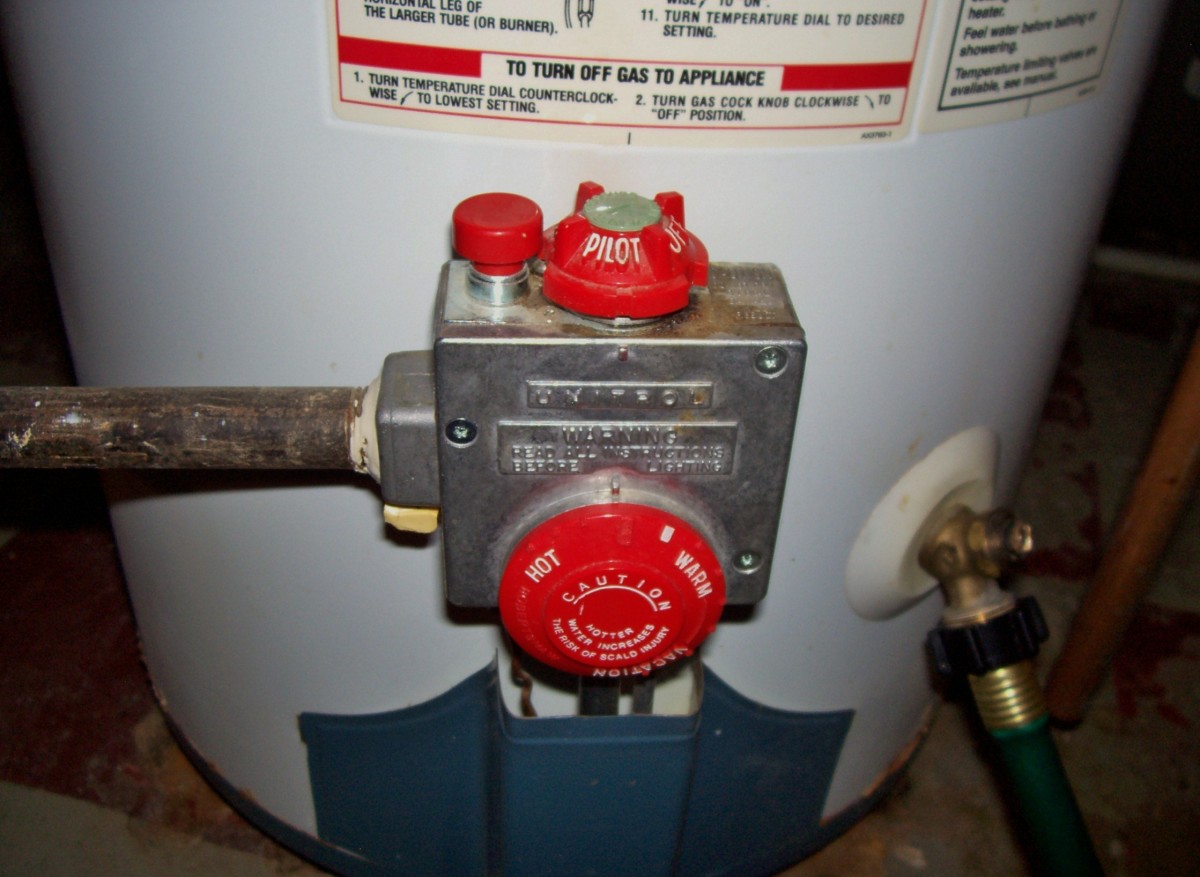
Once the gas is off and the area is safe, you need to find the pilot assembly.- Identify Components: Inside the access panel, you'll see the gas control valve, which is a central component. You'll also see the pilot tube, the thermocouple, and the main burner. The pilot light itself is a very small opening, usually covered by a small metal shield.
- Gas Control Knob Settings: Familiarize yourself with the settings on the gas control knob: "OFF," "PILOT," and "ON." These are essential for the relighting process.
The Relighting Process: A Detailed Walkthrough
There are two common ways to light a water heater pilot, depending on the age and model of your heater: manual ignition with a match/lighter, or a piezoelectric igniter (common in newer models like A.O. Smith or State water heaters). **Method 1: Manual Ignition (Older Models)**- Turn Knob to "PILOT": Turn the gas control knob to the “PILOT” position.
- Press and Hold Pilot Button: Next, press and hold the pilot light knob (or the dedicated "Pilot" button) firmly. This action allows a small amount of gas to flow to the pilot light.
- Ignite the Pilot: While continuing to hold down the pilot button, use a long lighter or match to carefully ignite the pilot light. Look into the pilot light opening to ensure you see a small, blue flame ignite.
- Continue Holding: Continue holding down the pilot button or gas control knob for 30 to 60 seconds, allowing the thermocouple to warm up sufficiently. This is crucial. If you release too soon, the thermocouple won't have generated enough current to keep the gas valve open, and the pilot light will go out.
- Release and Verify: Slowly release the pilot button. The pilot flame should remain lit. If it goes out, repeat steps 1-4.
- Turn to "ON": Once the pilot light is steadily burning, turn the gas control knob from “PILOT” to the “ON” position. You should hear the main burner ignite with a soft "whoosh" sound.
- Replace Cover: Replace the access cover.
- Turn Knob to "PILOT": Turn the gas control knob to the “PILOT” position.
- Press and Hold Pilot Button: Press and hold the pilot button firmly.
- Press Igniter Button: While holding the pilot button, repeatedly press the red or black igniter button (usually labeled "IGNITE") until you see the pilot light ignite. You might hear a clicking sound with each press.
- Continue Holding: Continue holding down the pilot button for 30 to 60 seconds to allow the thermocouple to warm up.
- Release and Verify: Slowly release the pilot button. The pilot flame should remain lit.
- Turn to "ON": Once the pilot light is steadily burning, turn the gas control knob from “PILOT” to the “ON” position. The main burner should ignite.
- Replace Cover: Replace the access cover.
Troubleshooting Common Pilot Light Issues
If your pilot light keeps going out, or if you can't get it to light at all, there might be a more persistent issue than a simple draft. Understanding common problems can help you decide if you can fix it yourself or if it's time to call a professional. 1. **Faulty Thermocouple:** This is the most common reason a pilot light won't stay lit. If the thermocouple is dirty, bent, or simply worn out, it won't generate enough current to keep the gas valve open. You can try gently cleaning the thermocouple with fine-grit sandpaper to remove any soot or debris. If the problem persists, the thermocouple likely needs to be replaced. This is a relatively inexpensive part, but replacement might require some technical skill. 2. **Blocked Pilot Tube:** The small tube that supplies gas to the pilot light can become clogged with dirt, dust, or spiderwebs, restricting gas flow. You can sometimes clear minor blockages by blowing compressed air through the tube (with the gas supply completely off!), but be very careful not to damage the tube. 3. **Weak Pilot Flame:** The pilot flame should be a strong, steady blue. If it's weak, yellow, or flickering, it might not be properly heating the thermocouple or providing enough ignition for the main burner. This could be due to a partially blocked pilot tube or an issue with the gas pressure. 4. **Gas Supply Issues:** Ensure that the gas supply valve to the water heater is fully open. If other gas appliances in your home (like your stove or furnace) are also experiencing issues, it could indicate a broader problem with your home's gas supply or an interruption from your utility provider. 5. **Drafts:** While less common for persistent issues, strong drafts in the utility area can sometimes blow out a pilot light. Ensure the water heater is not in an area with excessive airflow.When to Call a Professional: Recognizing Serious Problems
While relighting a pilot light is often a DIY task, there are clear instances when you should absolutely call a qualified plumbing or HVAC professional. Prioritizing safety and knowing your limits is crucial, especially with gas appliances. You should call a professional if:- You Smell Gas: This is the most critical warning sign. If you detect a strong gas odor, do not attempt any repairs or relighting. Evacuate your home and call your gas company or emergency services immediately.
- Pilot Light Won't Stay Lit After Multiple Attempts: If you've tried relighting the pilot several times following the instructions and it still won't stay lit, it's a strong indicator of a faulty thermocouple, a gas control valve issue, or another internal problem that requires expert diagnosis.
- Pilot Light is Yellow or Orange: A healthy pilot flame is typically blue. A yellow or orange flame indicates incomplete combustion, which can produce carbon monoxide, a dangerous, odorless gas. This requires immediate professional attention.
- Visible Damage or Leaks: If you notice any signs of physical damage to the water heater, gas lines, or any leaks (water or gas), do not attempt to operate the unit.
- You Hear Unusual Noises: Banging, rumbling, popping, or whistling noises coming from your water heater can indicate sediment buildup, pressure issues, or other mechanical failures.
- You Are Uncomfortable or Unsure: If you feel any apprehension or lack confidence in performing the relighting steps, it's always best to err on the side of caution and call a professional. They have the expertise, tools, and training to safely diagnose and repair gas appliances.
- Frequent Pilot Light Outages: If your pilot light goes out repeatedly, even after successful relighting, it signals an underlying problem that needs professional investigation rather than just a quick fix.
Maintaining Your Gas Water Heater's Pilot Light for Longevity
While the pilot light itself requires little direct maintenance, ensuring its longevity and consistent operation is tied to the overall health of your gas water heater. Proactive maintenance can prevent unexpected cold showers and extend the life of your appliance. 1. **Regular Professional Inspections:** Schedule annual inspections with a qualified technician. They can check the pilot light, thermocouple, gas lines, burner, and overall system for wear and tear, potential issues, and efficiency. This is the most effective way to catch problems before they lead to breakdowns. 2. **Keep the Area Clear:** Ensure the area around your water heater is free from clutter, especially flammable materials. Good airflow around the unit helps prevent overheating and ensures proper combustion. 3. **Check for Drafts:** While rare, strong drafts can sometimes extinguish a pilot light. If your water heater is in an exposed area, consider if any changes in ventilation could be affecting it. 4. **Monitor Flame Color:** Periodically (e.g., during your annual furnace filter change), peek at your pilot flame. It should be a steady blue. If it's flickering, yellow, or orange, it indicates a problem that needs attention. 5. **Address Sediment Buildup:** While not directly related to the pilot light, sediment buildup in the tank can affect the overall efficiency and lifespan of your water heater, indirectly stressing components like the burner and potentially affecting gas flow over time. Flushing your water heater annually can mitigate this. By taking these preventative measures, you can significantly reduce the chances of your pilot light going out unexpectedly and ensure your gas water heater continues to provide reliable hot water for years to come.Conclusion: Keeping the Flame Alive for Consistent Comfort
The pilot light on your gas water heater, though small, is an indispensable component that ensures your home has a consistent supply of hot water. From igniting the main burner to working in conjunction with the thermocouple for safety, its role is foundational. We’ve explored what a pilot light is, how it functions, and the clear signs that indicate it has gone out. More importantly, we've provided a detailed, step-by-step guide on how to safely relight it, emphasizing the critical safety precautions that must always be observed when dealing with gas appliances. Understanding common troubleshooting issues and knowing when to call a professional are equally vital. While relighting a pilot light can often be a straightforward DIY task, recognizing when a problem is beyond your scope—especially if you smell gas or the flame is discolored—is paramount for your safety and the longevity of your appliance. Regular maintenance and vigilance can prevent many common issues, keeping that little blue flame burning steadily and your hot water flowing reliably. Don't let a cold shower catch you off guard again! By arming yourself with this knowledge, you are better prepared to handle common water heater issues and ensure your home remains a haven of comfort. Have you ever had to relight your pilot light? Share your experiences or any tips you might have in the comments below! If this guide helped you, consider sharing it with friends and family who might also benefit from understanding their gas water heater better. For more helpful home maintenance tips and guides, explore other articles on our site.![Why Your Pilot Light Keeps Going Out & How To Fix [With Pictures]](https://www.supertechhvac.com/wp-content/uploads/2021/11/Pilot-Light-5-1-1229x2048-1.jpg)

Detail Author:
- Name : Marcelle Walker
- Username : tbergstrom
- Email : ypowlowski@yahoo.com
- Birthdate : 1975-09-13
- Address : 98892 Rippin Locks Suite 224 Xavierberg, NH 43847-5557
- Phone : +1-680-504-2003
- Company : Lebsack, Kohler and Schiller
- Job : Farm and Home Management Advisor
- Bio : Occaecati aut sit velit repellendus voluptatem sed consequuntur. Ad adipisci ex aut. Id molestiae commodi ut possimus sunt.
Socials
linkedin:
- url : https://linkedin.com/in/gudrun_official
- username : gudrun_official
- bio : Natus fugit et fugit consequatur deserunt.
- followers : 6669
- following : 2219
twitter:
- url : https://twitter.com/gudrun4683
- username : gudrun4683
- bio : Molestiae sit sit aliquid voluptates dolores aut. Sit et saepe est similique reiciendis odit. Dolores fuga et et maxime nemo rem.
- followers : 443
- following : 162
instagram:
- url : https://instagram.com/gudrun_effertz
- username : gudrun_effertz
- bio : Et ut quis consequatur cumque nesciunt qui voluptatem. Tenetur mollitia quam quaerat officia.
- followers : 4716
- following : 2071
